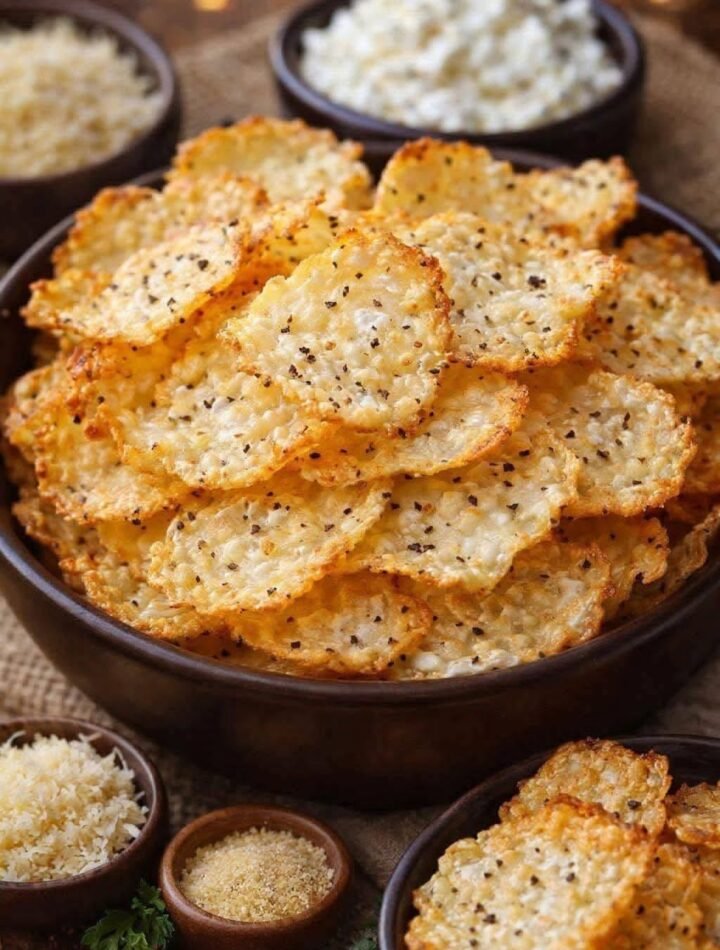
Looking for a perfectly crunchy, low-carb snack? These easy Parmesan Black Pepper Crisps require only 2 ingredients and bake to golden perfection in under 5 minutes!
Introduction: My Ultimate Guilt-Free Snack
Honestly, I have a massive weakness for crunchy, salty snacks. Whenever 3:00 PM rolls around, I’m usually raiding the pantry for potato chips or crackers. But a while back, I started trying to find something a bit lighter and lower in carbs that still gave me that incredibly satisfying crunch. That’s when I stumbled into making my own cheese crisps.
If you take a look at image_1628c1.jpg, you can see just how gorgeous, golden, and lacy these turn out! I usually make a massive bowl of them on Sunday afternoons. They are dangerously addictive, but because they are literally just baked cheese, they are packed with protein and practically zero carbs. Plus, you only need two ingredients and about 5 minutes to pull them together.
Here is my foolproof, go-to guide for making the perfect Parmesan Black Pepper Crisps at home!
What You’ll Need (Ingredients List)
You truly only need two things to make the magic happen, though I’ve included a little optional addition if you want to get fancy!
-
1 ½ cups Parmesan cheese: Must be freshly grated from a block! (See my tips below on why this matters).
-
1 to 2 teaspoons black pepper: Freshly cracked is absolutely the best for that sharp, peppery bite.
-
Optional: A pinch of garlic powder or a sprinkle of Italian seasoning if you want to mix up the flavor profile.
Step-by-Step Method
1. Prep Your Baking Sheet First, preheat your oven to 400°F (200°C). It is absolutely crucial that you line a large baking sheet with either parchment paper or a silicone baking mat. If you put the cheese directly on a bare metal pan, you will be scraping off stuck-on cheese for hours.
2. Portion the Cheese Using a spoon or your fingers, place small, even mounds of the grated Parmesan onto your prepared baking sheet. I usually aim for about 1 generous tablespoon per mound. Make sure you leave at least 1.5 to 2 inches of space between each pile—they spread out quite a bit as they melt!
3. Flatten and Season Gently pat down the top of each cheese mound so they form relatively flat, even circles. Sprinkle a generous amount of your freshly cracked black pepper directly over the top of each one.
4. Bake to a Crisp Pop the baking sheet into the preheated oven and bake for 3 to 5 minutes. Honestly, do not walk away! You need to watch them like a hawk because they go from perfectly golden to bitterly burnt in a matter of seconds. You are looking for the edges to be golden brown and the centers to be completely melted and bubbling.
5. Cool and Crisp Up Remove the pan from the oven. Do not touch them yet! They will be extremely soft and greasy when hot. Let them rest right there on the baking sheet for about 5 to 10 minutes. As they cool down, they will harden into those perfect, delicate, crispy wafers. Once completely cooled, gently peel them off the parchment.
My Top Cooking Tips
-
Ditch the Green Can: Honestly, you cannot use the pre-grated, powdery Parmesan in the shaker can for this. You also want to avoid the pre-shredded stuff in bags. Those have anti-caking agents (like cellulose) that prevent the cheese from melting together nicely. Always buy a wedge and grate it yourself!
-
Use the Fine Grate: I usually use the smaller holes on my box grater. Finely grated cheese melts more evenly and creates a prettier “lace” pattern than thick shreds.
-
Blot the Grease: Parmesan has natural oils. If you find your crisps are a little too greasy after cooling, simply dab them gently with a paper towel.
Serving Suggestions
While I usually eat these straight out of the bowl while watching TV, they are actually incredibly versatile!
-
Salad Upgrade: Break them into large pieces and use them instead of traditional bread croutons on a Caesar salad.
-
Soup Topper: Float a couple of these crisps on top of a hot bowl of creamy tomato basil soup or French onion soup.
-
Charcuterie Boards: They make a stunning, savory addition to any cheese board alongside grapes, cured meats, and olives.
Approximate Nutrition Info (Per Serving)
(Note: Makes about 12-15 crisps, serving size is ~3 crisps)
-
Calories: 110 kcal
-
Protein: 10g
-
Carbohydrates: 1g
-
Fat: 7g
-
Sodium: 380mg
Conclusion
There you have it—the easiest, most satisfying savory snack you will ever make! Once you master this incredibly simple technique, you’ll be making Parmesan Black Pepper Crisps every single week. They are elegant enough for a dinner party but quick enough for a midnight snack craving. Give them a try, and let me know how quickly they disappear in your house!
Frequently Asked Questions (FAQs)
1. Why are my cheese crisps chewy instead of crispy? This usually happens for two reasons: either they weren’t baked quite long enough (the bubbling needs to subside and edges must brown), or you didn’t let them cool completely on the pan. They only get crispy once they return to room temperature!
2. Can I use other types of cheese? Yes! Hard cheeses work best. Asiago, Romano, or even a sharp, aged Cheddar work beautifully. Softer cheeses like Mozzarella tend to be too oily and chewy, so stick to the hard stuff.
3. How should I store the leftover crisps? If you actually have leftovers (which is rare in my house!), store them in an airtight container at room temperature for up to 3 days. Do not put them in the fridge, or they will get soggy from the moisture.
4. Can I make these in the microwave? Honestly, yes, you can in a pinch! Place parchment paper on a microwave-safe plate, make your cheese mounds, and microwave on high for about 60 to 90 seconds until melted and lightly browned. However, the oven gives you a much better, more consistent crunch.
5. Are there other flavor variations I can try? Absolutely. While black pepper is classic, I love sprinkling them with Everything Bagel seasoning, a pinch of cayenne pepper for heat, or finely minced fresh rosemary before baking!