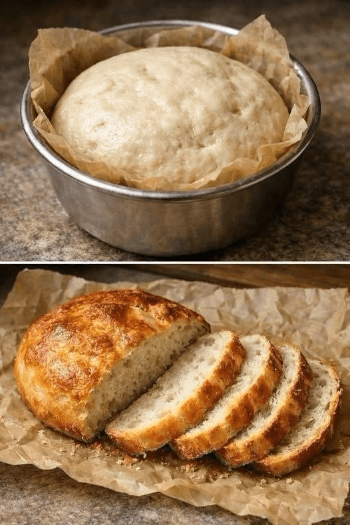
Learn how to make easy homemade no-knead artisan bread with a golden crust and soft, chewy center. This simple bread recipe requires minimal effort and basic ingredients.
Introduction
Honestly, homemade bread doesn’t have to be complicated. This No-Knead Artisan Bread is one of those recipes I usually make when I want fresh, bakery-style bread without spending hours kneading dough.
The dough comes together in just a few minutes, then you simply let it rest and develop its flavor. After baking, you get that gorgeous golden, crispy crust with a soft, airy center. It is perfect with butter, soup, sandwiches, or even just warm from the oven.
The best part? No stand mixer and no kneading required!
Ingredients
- 3 cups (375 g) all-purpose flour or bread flour
- 1 ½ teaspoons salt
- 1 teaspoon instant or active dry yeast
- 1 ½ cups (360 ml) warm water
- 1 teaspoon honey or sugar, optional
- 1 tablespoon olive oil, optional
- Extra flour, for shaping
Step-by-Step Method
1. Mix the Dough
In a large bowl, combine the flour, salt, and yeast. If using honey or sugar, add it as well.
Pour in the warm water and mix with a wooden spoon or spatula until a sticky, rough dough forms. Don’t worry if it looks messy—that’s exactly how it should look.
2. Let the Dough Rise
Cover the bowl tightly with plastic wrap or a clean kitchen towel.
Leave it at room temperature for 8–12 hours, preferably overnight. The dough should become puffy and almost double in size.
3. Shape the Bread
Lightly flour your work surface and carefully transfer the dough onto it.
Sprinkle a little flour over the dough and gently shape it into a round loaf. Avoid working the dough too much because you want to keep those lovely air bubbles.
Place the shaped dough on parchment paper and let it rest for another 30–45 minutes.
4. Preheat the Oven
Place a Dutch oven or heavy oven-safe pot with its lid inside the oven.
Preheat the oven to 450°F (230°C) for at least 30 minutes.
5. Bake
Carefully transfer the dough, along with the parchment paper, into the hot Dutch oven.
Cover with the lid and bake for 30 minutes.
Remove the lid and continue baking for another 10–15 minutes, or until the bread is deeply golden brown and beautifully crusty.
6. Cool Before Slicing
Remove the bread from the pot and place it on a wire rack.
I know it is tempting to slice it immediately, but honestly, letting it cool for at least 30–60 minutes gives the inside time to finish setting.
Then slice and enjoy!
Cooking Tips
- Don’t add too much flour. The dough should be sticky and wet.
- Use warm, not hot, water so you don’t damage the yeast.
- For the best flavor, let the dough rise overnight.
- Preheating the Dutch oven is important for getting that crispy crust.
- Don’t slice the bread while it’s piping hot, or the center can become gummy.
- For extra flavor, add 1 teaspoon of dried rosemary, garlic powder, or Italian seasoning to the dough.
Serving Suggestions
This homemade artisan bread is delicious served with:
- Salted butter
- Garlic butter
- Olive oil and herbs
- Creamy soups and stews
- Scrambled or fried eggs
- Sandwich fillings
- Cheese and deli meats
- Jam or honey
I especially love serving warm slices alongside a hearty soup—the crispy crust is perfect for dipping!
Storage
Store completely cooled bread in a paper bag or bread box at room temperature for up to 2–3 days.
For longer storage, slice the bread and freeze it in an airtight freezer bag for up to 3 months. Toast individual slices directly from frozen.
Approximate Nutrition
Per serving (1 of 10 slices):
- Calories: ~155
- Carbohydrates: ~30 g
- Protein: ~5 g
- Fat: ~1 g
- Fiber: ~1 g
- Sodium: ~350 mg
Nutrition is an estimate and will vary depending on the exact ingredients and serving size.
Conclusion
This Easy No-Knead Artisan Bread proves that you don’t need fancy equipment or advanced baking skills to make beautiful bread at home. With just flour, water, yeast, and salt, you can create a loaf with a crisp golden crust and wonderfully soft center.
I usually recommend making the dough the night before so you can wake up to dough that’s ready to bake. Once you try it, you may never look at store-bought bread the same way!
Frequently Asked Questions
1. Can I make this bread without a Dutch oven?
Yes. You can bake it on a preheated baking sheet or pizza stone. Adding a pan of hot water to the oven can help create steam and a crisp crust.
2. Can I let the dough rise overnight?
Absolutely. That’s actually one of the best things about this recipe. An 8–12 hour rise gives the bread better flavor and texture.
3. Why is my dough so sticky?
No-knead bread dough is naturally wetter and stickier than traditional bread dough. Avoid adding too much flour because it can make the finished loaf dense.
4. Can I use whole wheat flour?
Yes, but I recommend replacing only about 25–30% of the all-purpose flour with whole wheat flour at first. The loaf will be slightly denser and have a nuttier flavor.
5. How do I get a really crispy crust?
Bake the bread in a preheated covered Dutch oven. The trapped steam helps the bread develop that beautiful crackly crust. Remove the lid near the end so the outside can brown properly.