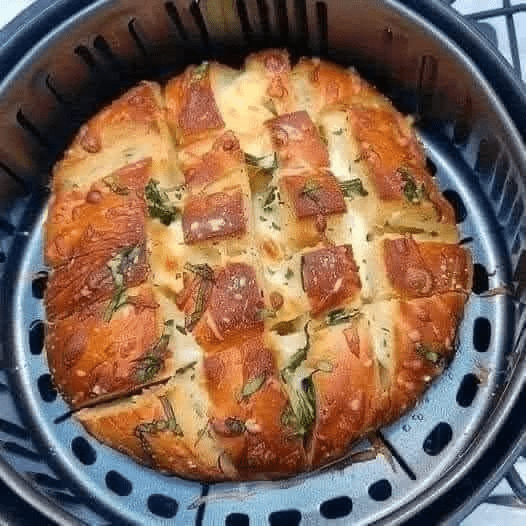
Air Fryer Pull Apart Cheese Garlic Bread is the kind of recipe that instantly elevates any meal or gathering. It takes a simple loaf of bread and transforms it into something deeply flavorful, aromatic, and irresistibly shareable. Each piece is infused with rich garlic butter, filled with melted cheese, and finished with a crisp, golden exterior that gives way to a soft, fluffy interior. The beauty of this dish lies not only in its taste but also in its texture and presentation—perfectly sliced sections that pull apart effortlessly, revealing gooey strands of cheese in every bite.
This recipe is ideal for everything from casual family dinners to entertaining guests. It can be served as an appetizer, a side dish, or even enjoyed on its own. The air fryer makes the process faster and more efficient than a conventional oven, while still delivering excellent results.
Below is a complete and detailed guide to preparing this dish, along with tips, variations, and serving suggestions to help you master it.
Ingredients
- 2 tablespoons unsalted butter or ghee
- 2 tablespoons olive oil
- 1 tablespoon finely chopped parsley
- 1 teaspoon Italian seasoning
- 4 garlic cloves, minced
- Salt and pepper to taste
- 1 loaf sourdough bread
- 1 cup shredded mozzarella cheese
Optional additions:
- Grated parmesan cheese for extra flavor
- Red chili flakes for a bit of heat
- Fresh basil for garnish
Preparation Overview
The process involves slicing the bread in a grid pattern, preparing a flavorful garlic butter mixture, filling the cuts with cheese, and then air frying until everything is melted, crisp, and aromatic. While the method is simple, attention to detail makes a significant difference in the final result.
Step-by-Step Instructions
Step 1: Prepare the Garlic Butter Mixture
Start by melting the butter in a small bowl. This can be done in the microwave for about 15 to 30 seconds, just until fully melted but not boiling. Once melted, add the olive oil, minced garlic, chopped parsley, Italian seasoning, salt, and pepper.
Stir everything together thoroughly until well combined. The mixture should be fragrant, with the garlic and herbs evenly distributed. The addition of olive oil helps balance the richness of the butter and prevents it from solidifying too quickly.
Step 2: Slice the Bread
Place the sourdough loaf on a cutting board. Using a serrated bread knife, begin slicing the bread diagonally. Make cuts about two-thirds of the way down into the loaf, being careful not to slice all the way through. The goal is to create deep pockets while keeping the base intact so the loaf holds together.
Once you have made diagonal cuts in one direction, turn the loaf and repeat the process in the opposite direction to create a crosshatch or grid pattern. This will form small square sections that can be easily pulled apart after baking.
Avoid cutting too close to the edges—leave about an inch around the perimeter to maintain the loaf’s structure.
Step 3: Add the Garlic Butter
Using a spoon or pastry brush, carefully drizzle the garlic butter mixture into all the cuts. Take your time with this step to ensure that the mixture seeps into every crevice.
Gently separate the sections slightly with your fingers to help the butter penetrate deeper into the bread. This ensures that every bite is flavorful, not just the top surface.
Step 4: Add the Cheese
Next, stuff shredded mozzarella cheese into all the cuts. Be generous, but avoid overfilling to the point where the cheese spills out excessively during cooking.
Make sure the cheese is distributed evenly throughout the loaf so that every section has a good amount. The cheese will melt and bind the bread pieces together slightly, while still allowing them to be pulled apart.
If desired, you can add a sprinkle of parmesan cheese on top for a sharper, nuttier flavor.
Step 5: Prepare the Air Fryer
Preheat your air fryer to 180°C (350°F) if your model requires preheating. This step helps ensure even cooking from the start.
Depending on the size of your air fryer, you may need to slightly compress the loaf or trim it to fit. You can also wrap the bread loosely in foil for the first part of cooking to prevent the top from browning too quickly.
Step 6: Air Fry the Bread
Place the prepared loaf into the air fryer basket. Cook at 180°C (350°F) for about 8 to 10 minutes.
If you are using foil, remove it during the last 2 to 3 minutes of cooking to allow the top to crisp up and develop a golden-brown finish.
Keep an eye on the bread during the final minutes. The cheese should be fully melted and bubbly, and the edges of the bread should be crisp without being burnt.
Step 7: Final Touches and Serving
Once done, carefully remove the bread from the air fryer. Let it cool for a minute or two before serving. This helps the cheese set slightly and makes it easier to handle.
Garnish with additional chopped parsley, basil, or a light sprinkle of chili flakes if desired.
Serve warm and enjoy by pulling apart the sections with your hands.
Tips for Best Results
- Choose the right bread: Sourdough works especially well because of its sturdy crust and soft interior. It holds up to the butter and cheese without becoming soggy.
- Do not cut all the way through: Keeping the base intact is essential for structure.
- Distribute evenly: Make sure both the butter mixture and cheese reach deep into the cuts.
- Monitor cooking time: Air fryers can vary, so check frequently toward the end.
- Use fresh garlic: It provides a much stronger and more authentic flavor compared to pre-minced options.
Flavor Variations
This recipe is highly adaptable, allowing you to experiment with different flavors and ingredients.
Cheesy Herb Explosion
Add multiple types of cheese such as cheddar, gouda, or provolone along with mozzarella for a richer taste.
Spicy Garlic Bread
Include chopped jalapeños or extra chili flakes in the butter mixture for a kick of heat.
Meaty Version
Insert small pieces of cooked bacon, sausage, or pepperoni into the cuts along with the cheese.
Vegan Option
Use plant-based butter and cheese alternatives. The method remains the same, and the results can still be delicious.
Serving Suggestions
Air Fryer Pull Apart Cheese Garlic Bread pairs well with a variety of dishes:
- Pasta dishes such as spaghetti or lasagna
- Soups like tomato or creamy mushroom
- Salads for a balanced meal
- As a party appetizer or snack
It can also be served with dipping sauces such as marinara, ranch, or garlic aioli.
Storage and Reheating
If you have leftovers, store them in an airtight container in the refrigerator for up to 2 days.
To reheat:
- Place in the air fryer at 160°C (320°F) for 3 to 5 minutes
- Avoid microwaving, as it can make the bread soft and chewy rather than crisp
Final Thoughts
Air Fryer Pull Apart Cheese Garlic Bread is a perfect example of how simple ingredients can be transformed into something impressive with the right technique. The combination of crispy crust, soft interior, aromatic garlic butter, and melted cheese creates a dish that is both comforting and satisfying.