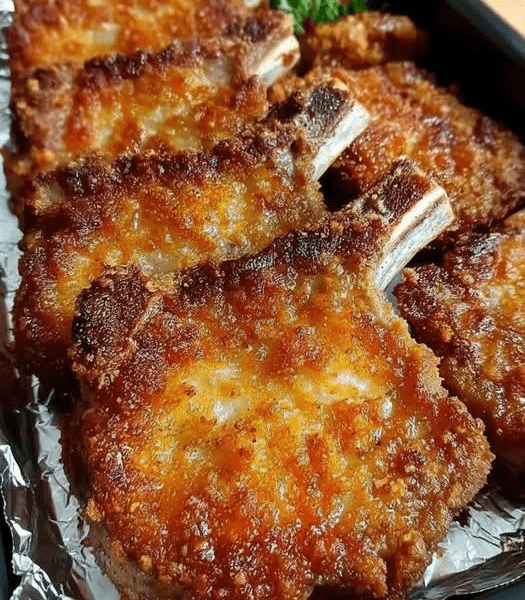
Air fryer breaded pork chops are one of the best ways to enjoy crispy, golden-brown pork without the heaviness of deep frying. The air fryer creates a crunchy exterior while keeping the meat inside juicy and tender. Many people struggle with pork chops because they often turn out dry or bland, but with the right preparation and cooking method, pork chops can become one of the most flavorful and satisfying meals you can make at home.
This recipe combines seasoned breadcrumbs, simple spices, and perfectly cooked pork chops to create a dish that is both comforting and impressive. The coating becomes crisp and deeply golden while the pork remains moist and flavorful. Because the air fryer circulates hot air around the food, the breading cooks evenly and develops a satisfying crunch with far less oil than traditional frying methods.
These breaded pork chops are perfect for busy weeknight dinners, family meals, or even special occasions. They pair beautifully with mashed potatoes, roasted vegetables, salads, rice, or pasta. The recipe is also versatile because you can customize the seasoning blend to suit your taste preferences.
The key to success is choosing the right pork chops, seasoning them properly, and avoiding overcooking. Thick pork chops are ideal because they stay tender while the coating crisps up in the air fryer. A quick breading process creates layers of flavor and texture that make every bite delicious.
Why Air Fryer Pork Chops Work So Well
Traditional pork chops are often baked or pan-fried, but these methods can easily dry out the meat if not monitored carefully. The air fryer solves many of these problems by cooking food quickly and evenly.
The circulating hot air creates a crispy crust similar to deep frying, but with significantly less oil. At the same time, the shorter cooking time helps preserve the pork’s natural juices.
Another advantage is convenience. The air fryer preheats quickly, cooks efficiently, and requires minimal cleanup. The result is restaurant-quality breaded pork chops with less effort and less mess.
Ingredients
For the Pork Chops
- 4 bone-in pork chops, about 1 inch thick
- 1 tablespoon olive oil
For the Breading Station
Flour Mixture
- 1 cup all-purpose flour
- 1 teaspoon salt
- 1 teaspoon black pepper
- 1 teaspoon garlic powder
- 1 teaspoon onion powder
- 1 teaspoon paprika
Egg Mixture
- 2 large eggs
- 2 tablespoons milk
Breadcrumb Mixture
- 1 1/2 cups breadcrumbs or panko breadcrumbs
- 1/2 cup grated Parmesan cheese
- 1 teaspoon Italian seasoning
- 1/2 teaspoon smoked paprika
Optional Garnishes
- Fresh parsley
- Lemon wedges
Choosing the Best Pork Chops
The type of pork chop you use has a major impact on the final dish.
Bone-In Pork Chops
Bone-in pork chops are highly recommended because the bone helps retain moisture and flavor during cooking. They also tend to cook more evenly.
Thickness Matters
Choose pork chops that are about 1 inch thick. Thin pork chops cook too quickly and can become dry before the breading crisps properly.
Boneless Pork Chops
Boneless chops can also be used, but they require careful monitoring to avoid overcooking.
Preparing the Pork Chops
Before breading the pork chops, pat them dry thoroughly with paper towels. Removing excess moisture helps the coating stick better and improves browning.
If the pork chops have excess fat around the edges, trim slightly if desired. However, leaving some fat helps maintain flavor and juiciness.
Lightly rub the pork chops with olive oil before breading. This helps the coating adhere and contributes to a crisp finish.
Setting Up the Breading Station
A proper breading station ensures even coating and less mess.
Use three shallow bowls:
- Flour mixture
- Egg mixture
- Breadcrumb mixture
The flour helps the egg stick to the pork chops, while the egg acts as glue for the breadcrumbs. The final breadcrumb layer creates the crispy crust.
Step-by-Step Instructions
Step 1: Season the Flour
In the first bowl, combine:
- Flour
- Salt
- Black pepper
- Garlic powder
- Onion powder
- Paprika
Mix thoroughly so the seasonings are evenly distributed.
Step 2: Prepare the Egg Mixture
In the second bowl, whisk together:
- Eggs
- Milk
The milk helps loosen the eggs slightly, creating a smoother coating.
Step 3: Prepare the Breadcrumb Mixture
In the third bowl, combine:
- Breadcrumbs or panko
- Parmesan cheese
- Italian seasoning
- Smoked paprika
Panko breadcrumbs create an especially crispy texture because they are lighter and flakier than regular breadcrumbs.
Parmesan cheese adds savory richness and helps the coating brown beautifully.
Step 4: Bread the Pork Chops
Dredge each pork chop in the flour mixture, coating both sides evenly. Shake off excess flour.
Dip the pork chop into the egg mixture, ensuring it is fully coated.
Press the pork chop into the breadcrumb mixture, covering every surface thoroughly. Press gently so the breadcrumbs adhere well.
Place the breaded pork chops on a plate or tray.
Let them rest for about 5 minutes before cooking. This helps the coating stick better during air frying.
Air Fryer Cooking Instructions
Step 1: Preheat the Air Fryer
Preheat the air fryer to 400°F (200°C) for about 3 to 5 minutes.
Preheating helps create an immediate crisp exterior once the pork chops are added.
Step 2: Arrange the Pork Chops
Lightly spray the air fryer basket with cooking spray.
Place the pork chops in a single layer without overlapping. Air circulation is essential for even crisping.
Depending on the size of your air fryer, you may need to cook in batches.
Step 3: Cook the Pork Chops
Air fry at 400°F (200°C) for 12 to 15 minutes, flipping halfway through cooking.
Cooking time may vary depending on thickness and air fryer model.
The breading should become deep golden brown and crispy.
The internal temperature should reach 145°F (63°C) when checked with a meat thermometer.
Resting the Pork Chops
Once cooked, transfer the pork chops to a plate and let them rest for 5 minutes before serving.
Resting allows the juices to redistribute throughout the meat, keeping the pork moist and flavorful.
Cutting immediately can cause juices to escape, resulting in drier pork.
Why Pork Chops Often Become Dry
Pork chops are lean, which means they can overcook quickly. The most common mistakes include:
- Using thin pork chops
- Cooking at too low a temperature for too long
- Overcooking past the recommended temperature
- Skipping the resting period
Using an air fryer minimizes these problems because the quick cooking process preserves moisture while creating crisp breading.
Flavor Variations
One of the best aspects of this recipe is how easy it is to customize.
Spicy Version
Add cayenne pepper or chili flakes to the breadcrumb mixture.
Herb Crusted Pork Chops
Use fresh chopped rosemary, thyme, or parsley in the breading.
Garlic Parmesan Style
Increase the Parmesan cheese and garlic powder for a richer flavor.
Southern Style
Add seasoned cornmeal to the breadcrumb mixture for extra crunch.
Italian Style
Use Italian breadcrumbs and extra herbs for a Mediterranean-inspired version.
Best Side Dishes
Air fryer breaded pork chops pair well with many classic side dishes.
Mashed Potatoes
Creamy mashed potatoes complement the crispy coating beautifully.
Roasted Vegetables
Carrots, broccoli, Brussels sprouts, or asparagus provide balance and freshness.
Macaroni and Cheese
Rich and cheesy pasta creates a comforting meal combination.
Coleslaw
The cool crunch of coleslaw contrasts nicely with the warm crispy pork.
Rice Pilaf
Light seasoned rice works well for a simpler side option.
Garden Salad
A fresh salad helps balance the richness of the breading.
Dipping Sauces
Although these pork chops are flavorful on their own, sauces can add another layer of taste.
- Honey mustard
- Ranch dressing
- Garlic aioli
- Barbecue sauce
- Spicy mayo
- Creamy gravy
Storage Instructions
Refrigeration
Store leftover pork chops in an airtight container in the refrigerator for up to 3 days.
Reheating Tips
The air fryer is also the best method for reheating.
Reheat at 350°F (175°C) for 3 to 5 minutes until hot and crispy again.
Avoid microwaving if possible because it softens the breading.
Freezing Instructions
Breaded pork chops can be frozen before or after cooking.
Freezing Before Cooking
Place breaded uncooked pork chops on a baking sheet and freeze until solid. Transfer to freezer bags and store for up to 2 months.
Cook directly from frozen, adding several extra minutes to the cooking time.
Freezing After Cooking
Allow cooked pork chops to cool completely before freezing.
Reheat in the air fryer for best texture.
Nutritional Information
Approximate values per serving:
- Calories: 450–550
- Protein: 35–40 grams
- Carbohydrates: 20–25 grams
- Fat: 20–30 grams
Values vary depending on pork chop size and breading thickness.
Tips for the Crispiest Coating
Use Panko Breadcrumbs
Panko creates a lighter, crunchier crust than traditional breadcrumbs.
Do Not Overcrowd
Air must circulate freely around the pork chops.
Spray Lightly with Oil
A light coating of cooking spray helps achieve even browning.
Flip Halfway Through
Turning the pork chops ensures both sides crisp evenly.
Common Mistakes to Avoid
Skipping Preheating
A hot air fryer starts crisping immediately.
Overcooking
Use a thermometer to prevent dry pork.
Wet Breading
Pat pork chops dry before coating.
Thick Uneven Coating
Apply breading evenly to avoid soggy spots.
Final Thoughts
Air fryer breaded pork chops are proof that simple ingredients and proper cooking techniques can create an incredibly satisfying meal. The contrast between the crispy golden coating and the juicy tender pork makes this dish irresistible.