There is something deeply satisfying about baking your own bread at home. The smell that fills the kitchen, the crackling crust as the loaves cool, and the warm soft center make homemade bread feel comforting and rewarding. Many people assume bread baking is difficult or time-consuming, but this recipe proves the opposite. With only a few inexpensive ingredients and no kneading required, anyone can make bakery-style bread at home.
This recipe is ideal for beginners because it removes the most intimidating part of bread making: kneading. Traditional bread recipes often require long mixing and kneading sessions to develop gluten. In this method, time does the work instead. A slow rise creates structure, flavor, and texture naturally.
Another advantage is affordability. Store-bought bread prices continue to rise, especially for artisan loaves. Making bread at home costs only a fraction of the price and allows complete control over ingredients. There are no preservatives, unnecessary additives, or artificial flavors. Just simple pantry staples transformed into fresh bread.
This bread is also versatile. It can be used for sandwiches, toast, soups, garlic bread, or served alongside dinner. The crust is lightly crisp while the inside remains soft and airy. Even better, the dough can be prepared ahead of time and baked when needed.
Why This Recipe Works
The secret behind no-knead bread is hydration and time. The dough contains enough water to allow gluten strands to form naturally during the resting period. Instead of physically kneading the dough, you simply mix the ingredients together and let the yeast slowly do the work.
Because this recipe uses minimal yeast and a longer resting period, the bread develops a richer flavor than many quick bread recipes. The long fermentation creates tiny air pockets throughout the dough, producing a texture similar to artisan bakery bread.
The recipe is also forgiving. Exact shaping skills are unnecessary, and minor imperfections usually disappear during baking. This makes it ideal for first-time bakers.
Ingredients
This recipe makes 4 medium loaves or 2 large loaves.
Ingredients List
- 8 cups all-purpose flour or bread flour
- 3 cups warm water
- 2 teaspoons salt
- 2 teaspoons instant yeast
- 1 tablespoon sugar (optional but helps activate the yeast)
Understanding the Ingredients
Flour
All-purpose flour works perfectly well for this recipe and is usually the cheapest option. Bread flour creates a slightly chewier texture because it contains more protein, but either can be used successfully.
If you want a healthier version, you can replace part of the white flour with whole wheat flour. However, avoid replacing all the flour because whole wheat absorbs more water and can make the bread dense.
Yeast
Instant yeast is the easiest type to use because it can be mixed directly into the flour without proofing. Active dry yeast also works, but it should first be dissolved in warm water for several minutes.
Yeast is what causes the dough to rise. During fermentation, it feeds on sugars in the flour and releases carbon dioxide, creating air pockets that make the bread light and fluffy.
Salt
Salt is essential for flavor. Without it, bread tastes flat and bland. Salt also strengthens gluten structure and helps control yeast activity.
Water
Warm water activates the yeast and hydrates the flour. The water should feel warm but not hot. Extremely hot water can kill the yeast.
Sugar
Sugar is optional, but it slightly improves browning and gives the yeast a quick source of food.
Step-by-Step Instructions
Step 1: Mix the Dough
In a very large bowl, combine the flour, salt, yeast, and sugar.
Slowly pour in the warm water while mixing with a spoon or spatula. Continue stirring until all the flour is incorporated. The dough will look sticky and rough. This is completely normal.
Do not knead the dough.
Once mixed, cover the bowl with plastic wrap, a lid, or a clean towel.
Step 2: Let the Dough Rise
Place the covered bowl in a warm area and let the dough rise for 2 to 3 hours, or until doubled in size.
For even better flavor, you can refrigerate the dough overnight after the initial rise. Slow fermentation improves texture and taste.
During this resting time, gluten develops naturally without kneading.
Step 3: Prepare the Baking Pans
Line loaf pans or baking trays with parchment paper. This prevents sticking and makes cleanup easier.
Lightly dust the surface of the dough with flour to make handling easier.
Divide the dough into equal portions depending on how many loaves you want.
Gently shape each portion into a round or oval loaf. Avoid overhandling because the dough contains trapped air bubbles that help create a soft interior.
Place the shaped dough into the prepared pans.
Step 4: Second Rise
Cover the shaped loaves loosely with a towel and allow them to rise again for 30 to 45 minutes.
During this stage, the loaves become puffier and lighter.
Meanwhile, preheat the oven to 425°F (220°C).
Step 5: Bake the Bread
Place the loaves into the preheated oven.
Bake for approximately 25 to 35 minutes depending on loaf size.
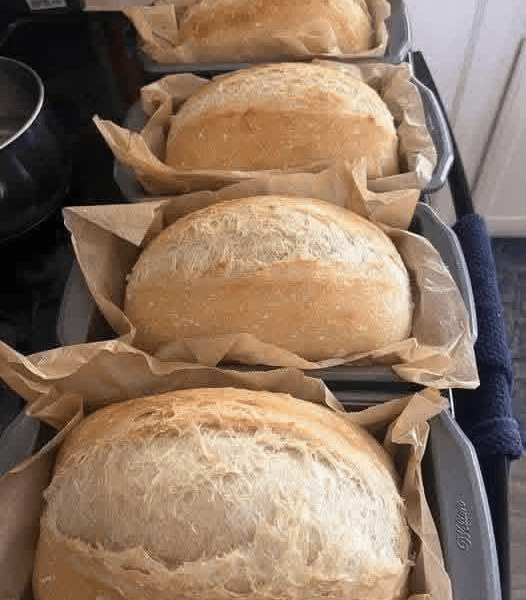
The bread should develop a golden brown crust. When tapped on the bottom, the loaf should sound hollow.
For an extra crispy crust, place a small oven-safe pan filled with hot water on the bottom rack during baking. The steam helps create a bakery-style exterior.
Step 6: Cool Before Slicing
Remove the bread from the oven and place it on a wire rack.
Allow the loaves to cool for at least 20 minutes before slicing. Cutting too early can release steam and make the inside gummy.
As the bread cools, the crust will continue to develop texture.
Tips for Success
Use the Right Water Temperature
Warm water should be around 100°F to 110°F. If the water is too hot, the yeast may die. If too cold, the dough may rise slowly.
Do Not Add Too Much Flour
Sticky dough creates softer bread. Adding excessive flour can make the loaves dense and dry.
Allow Enough Rising Time
Patience is important in bread baking. Proper fermentation creates better texture and flavor.
Use Parchment Paper
No-knead dough can be sticky. Parchment paper makes transferring and baking much easier.
Store Properly
Homemade bread does not contain preservatives, so it is best eaten within a few days.
Store in:
- A bread box
- A paper bag
- A sealed container after fully cooled
Avoid refrigerating bread because it can dry out faster.
Variations You Can Try
One of the best things about this recipe is how adaptable it is.
Garlic Herb Bread
Add:
- 1 tablespoon dried herbs
- 2 teaspoons garlic powder
This version pairs beautifully with pasta and soups.
Whole Wheat Bread
Replace 2 cups of white flour with whole wheat flour for added fiber and nutrition.
Cheese Bread
Mix shredded cheese into the dough before the first rise.
Seeded Bread
Top the loaves with sesame seeds, sunflower seeds, or oats before baking.
Rustic Artisan Bread
Bake the dough inside a preheated Dutch oven for a crisp artisan crust.
Why Homemade Bread Is Worth It
Many people begin baking bread to save money, but continue because of the quality and flavor. Fresh homemade bread has a softness and aroma difficult to match with packaged supermarket loaves.
Homemade bread also allows ingredient control. Many commercial breads contain preservatives, added sugars, oils, and conditioners. Making your own ensures a cleaner ingredient list.
Another benefit is flexibility. You can shape the dough into sandwich loaves, dinner rolls, pizza crust, or flatbread. One simple dough can create many different baked goods.
Bread baking can also become a relaxing routine. The process is slow but uncomplicated, and the results are rewarding every time.
Common Problems and Solutions
Bread Did Not Rise
Possible causes:
- Expired yeast
- Water too hot
- Cold room temperature
Solution:
Use fresh yeast and place dough in a warmer location.
Bread Is Dense
Possible causes:
- Too much flour
- Insufficient rising time
Solution:
Keep the dough sticky and allow enough fermentation.
Crust Too Hard
Possible causes:
- Overbaking
- Lack of steam
Solution:
Reduce baking time slightly and add steam during baking.
Dough Too Sticky to Handle
This is normal for no-knead bread. Dust hands and surfaces lightly with flour, but avoid adding large amounts.
Final Thoughts
This no-knead bread recipe proves that homemade bread does not need to be complicated, expensive, or time-consuming. With only flour, water, salt, and yeast, you can create beautiful golden loaves with minimal effort.