Craving a crunchy, cheesy snack without the carbs? These easy keto cheddar cheese breadsticks are crispy, gluten-free, and ready in 20 minutes!
Why I Love This Recipe
Honestly, there are days when the afternoon slump hits me like a freight train. Between juggling client calls for Moon Light Events, double-checking our equipment inventory, and managing the kids’ endless stream of activities, my energy levels usually plummet by 3:00 PM. We all get those intense cravings for something warm, salty, and comforting, but I don’t always want to resort to heavy carbs that will just make me sleepier.
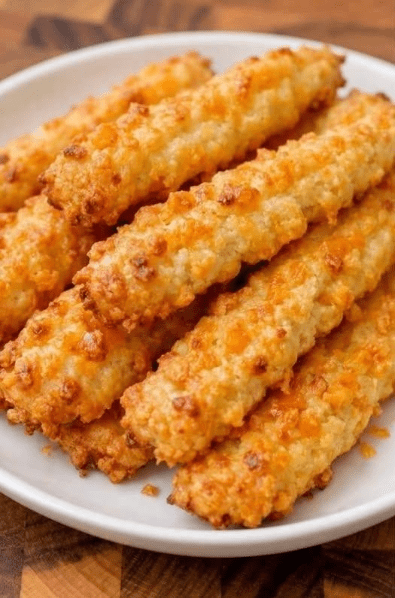
That’s exactly why these Crispy Keto Cheddar Cheese Breadsticks have become my ultimate snacking secret weapon. I usually spend about five minutes mixing the simple almond flour and cheese dough, and then let the oven do the rest. They bake up incredibly crispy on the outside, slightly chewy on the inside, and are packed with savory garlic and cheddar flavor.
Take a look at how gorgeously golden and crunchy they turn out in image_7755a8.jpg! It’s an honest, foolproof recipe that satisfies that “junk food” craving while keeping things low-carb and entirely gluten-free. My kids devour them, and I don’t feel an ounce of guilt.
What You’ll Need (Ingredients)
I love that this relies on simple ingredients I already keep in my low-carb pantry. Here is what you need to grab:
-
1 ½ cups Shredded Mozzarella Cheese: Use low-moisture, part-skim mozzarella. This is the base of our “fathead” dough.
-
1 cup Sharp Cheddar Cheese: Freshly shredded is best, as it gives these sticks their beautiful golden color and sharp flavor.
-
1 cup Blanched Almond Flour: Ensure it’s finely ground so your breadsticks don’t turn out gritty.
-
1 Large Egg: Beaten. This acts as the binder to hold the dough together.
-
1 tsp Garlic Powder & 1/2 tsp Onion Powder: Essential for that classic, savory breadstick taste.
-
1/4 tsp Coarse Salt: To balance the richness of the cheese.
Step-by-Step Method
Step 1: Prep Your Space Preheat your oven to 400°F (200°C). Line a large baking sheet with parchment paper. Do not skip the parchment paper, or the cheese will fuse to your pan!
Step 2: Melt the Cheese Base In a large microwave-safe bowl, combine the shredded mozzarella and shredded cheddar. Microwave on high for 1 minute. Stir, then microwave for another 30 seconds until the cheeses are completely melted and gooey.
Step 3: Form the Dough Immediately add the almond flour, beaten egg, garlic powder, onion powder, and salt to the melted cheese. Use a sturdy spatula (or your hands, once it’s cool enough to touch) to knead everything together until a uniform dough forms. Note: If the cheese hardens before it’s fully mixed, pop it back in the microwave for 10-15 seconds.
Step 4: Shape the Breadsticks Divide the dough into 8 to 10 equal pieces. Roll each piece between your hands to form long, textured sticks, and place them on your prepared baking sheet, leaving an inch between each one.
Step 5: Bake to Perfection Bake for 12 to 15 minutes, or until the breadsticks are beautifully golden brown and crispy on the edges.
Step 6: Cool and Serve Let them cool on the baking sheet for at least 5 minutes before moving them. They will crisp up even more as they cool down!
My Top Cooking Tips
-
Wet your hands: Almond flour and melted cheese dough can be incredibly sticky. I usually lightly wet my hands with water or a tiny drop of olive oil before rolling out the sticks to keep the dough from sticking to my fingers.
-
Don’t overbake: Keep a close eye on them around the 10-minute mark. Almond flour can go from perfectly golden to burnt very quickly.
-
Freshly grate your cheese: Pre-shredded bagged cheeses are coated in starches that prevent them from clumping. For the smoothest, best-binding dough, grate your mozzarella and cheddar straight from the block.
Serving Suggestions
These are absolutely fantastic on their own, but they are even better when you have something to dip them in! My go-to pairings are:
-
A side of warm, low-sugar marinara sauce for classic pizza-parlor vibes.
-
Creamy garlic ranch dressing.
-
Served alongside a big, fresh Caesar salad or a bowl of hot tomato soup.
Nutrition Information (Approximate)
Serves: 4 (About 2 breadsticks per serving)
-
Calories: 290 kcal
-
Protein: 18g
-
Carbohydrates: 6g
-
Net Carbs: 3g
-
Fat: 23g
-
Sodium: 410mg
Conclusion
If you’ve been missing the satisfying crunch of breadsticks on a low-carb or gluten-free diet, you absolutely have to try these Crispy Keto Cheddar Cheese Breadsticks. They are quick, incredibly satisfying, and the perfect side dish or afternoon snack. Drop a comment below and let me know what your favorite dipping sauce is!
Frequently Asked Questions (FAQs)
1. Can I substitute coconut flour for the almond flour? Honestly, no. Coconut flour absorbs moisture completely differently than almond flour. If you swap it 1:1, your dough will be incredibly dry and crumbly. This recipe is specifically formulated for fine almond flour!
2. Can I make these in the air fryer? Yes, you absolutely can! Place the shaped sticks on a piece of parchment paper cut to fit your air fryer basket. Air fry at 375°F (190°C) for about 8 to 10 minutes until golden and crispy.
3. Why did my breadsticks spread out flat in the oven? This usually happens if your cheese was too hot and oily when it went into the oven, or if your eggs were extra large and added too much moisture. Make sure to let the dough rest for just a minute before rolling it out so it holds its shape.
4. Are these breadsticks gluten-free? Yes! Because we use almond flour instead of traditional wheat flour, this recipe is 100% naturally gluten-free.
5. How do I store and reheat leftovers? Store any leftover cheese sticks in an airtight container in the fridge for up to 4 days. To get that crispy texture back, reheat them in the air fryer for 2-3 minutes, or in the oven at 350°F until warmed through. Microwaving them will make them soft and chewy instead of crispy.