Description
Learn how to make soft, fluffy homemade bread in your air fryer. This easy and affordable bread recipe is perfect for beginners and can save money on store-bought bread.
Air Fryer Homemade Bread – The Easy Loaf That Replaced Store-Bought Bread
Why I Started Baking Bread in My Air Fryer
A few months ago, I decided to try making bread in my air fryer just to see if it would work. Honestly, I wasn’t expecting much. I figured it might be convenient, but I never imagined it would become part of my weekly routine.
Fast forward to today, and I haven’t bought a loaf of bread in months.
Not only is homemade air fryer bread incredibly easy to make, but it’s also surprisingly affordable. With just a handful of pantry staples, I can bake a fresh loaf that’s soft on the inside, golden on the outside, and perfect for sandwiches, toast, or simply slathering with butter.
I usually make a loaf every few days because it’s so simple, and my kitchen smells amazing every single time. If you’ve never baked bread before, don’t worry—this recipe is beginner-friendly and practically foolproof.
Why You’ll Love This Recipe
- Much cheaper than store-bought bread
- Soft and fluffy texture
- Crispy golden crust
- Made with simple pantry ingredients
- Perfect for beginners
- No oven required
- Great for sandwiches and toast
Ingredients
For the Bread Dough
- 3 cups (375g) all-purpose flour
- 1 teaspoon salt
- 1 tablespoon sugar
- 2 teaspoons instant yeast
- 1 cup (240ml) warm water
- 2 tablespoons olive oil
Optional Topping
- 1 egg, beaten (for brushing)
- Melted butter for a softer crust
Step-by-Step Method
Step 1: Activate the Dough
In a large mixing bowl, combine:
- Warm water
- Sugar
- Yeast
Let the mixture sit for about 5 minutes until it becomes foamy.
If you’re using instant yeast, you can skip the waiting time, but I usually let it sit anyway just to make sure the yeast is active.
Step 2: Mix the Dough
Add:
- Flour
- Salt
- Olive oil
Mix until a shaggy dough forms.
Step 3: Knead the Dough
Transfer the dough to a lightly floured surface.
Knead for 8 to 10 minutes until smooth and elastic.
You can also use a stand mixer with a dough hook if you prefer.
Step 4: First Rise
Place the dough in a lightly greased bowl.
Cover with a kitchen towel and let rise for about 1 hour or until doubled in size.
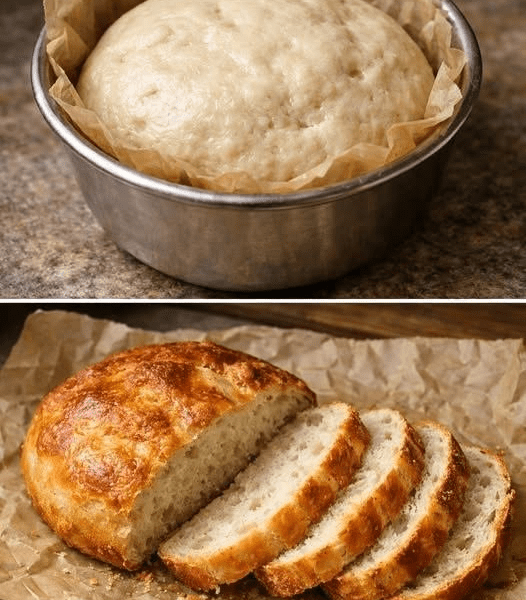
Step 5: Shape the Loaf
Punch down the dough gently.
Shape it into a round loaf and place it into a parchment-lined baking pan that fits inside your air fryer basket.
Step 6: Second Rise
Cover again and let the dough rise for 20 to 30 minutes.
The loaf should become slightly puffy.
Step 7: Prepare for Baking
Brush the top with beaten egg if desired.
This creates a beautiful golden finish.
Step 8: Air Fry the Bread
Preheat the air fryer to 320°F (160°C).
Bake the bread for 20 to 25 minutes until:
- Golden brown on top
- Hollow-sounding when tapped
- Internal temperature reaches 190°F–200°F (88°C–93°C)
Step 9: Cool Before Slicing
Remove the bread and place it on a cooling rack.
Let it cool for at least 20 minutes before slicing.
This is honestly the hardest part because the smell is irresistible.
Cooking Tips for Perfect Air Fryer Bread
Use Warm Water, Not Hot
Water that’s too hot can kill the yeast.
Aim for approximately 105°F–110°F (40°C–43°C).
Don’t Rush the Rise
Proper proofing creates a lighter, fluffier loaf.
Check Early
Every air fryer cooks differently.
Start checking around the 18-minute mark.
Cover if Browning Too Fast
If the top gets dark too quickly, loosely cover it with foil.
Let It Cool Completely
Fresh bread continues cooking internally as it cools.
Cutting too soon can make the texture gummy.
Serving Suggestions
This homemade bread is incredibly versatile.
I usually enjoy it with:
- Butter and jam
- Homemade soup
- Sandwiches
- Grilled cheese
- Avocado toast
- Garlic butter
- Scrambled eggs
- Peanut butter and honey
It’s also fantastic toasted the next day.
Approximate Nutrition Information
Servings: 10 slices
Per Slice:
- Calories: 140
- Protein: 4g
- Carbohydrates: 26g
- Fat: 3g
- Fiber: 1g
- Sugar: 1g
- Sodium: 230mg
Nutritional values may vary depending on ingredients used.
Money-Saving Benefits of Homemade Bread
One of the biggest reasons I keep making this recipe is the cost.
A loaf of bakery-style bread can easily cost $4 to $7 in many stores.
This homemade version often costs less than $1.50 to make, depending on local ingredient prices.
Over a few months, those savings really add up.
Plus, you know exactly what’s going into your bread.
Frequently Asked Questions
1. Can I use bread flour instead of all-purpose flour?
Yes. Bread flour will produce a slightly chewier texture and better rise.
2. How long does homemade air fryer bread stay fresh?
It stays fresh for about 3 days at room temperature when stored in an airtight container.
3. Can I freeze this bread?
Absolutely. Slice it first and freeze for up to 3 months.
4. Why didn’t my bread rise?
The yeast may have expired, or the water may have been too hot or too cold.
5. Can I add herbs or cheese?
Definitely. Rosemary, garlic, cheddar, parmesan, and everything bagel seasoning are all delicious additions.
Conclusion
If someone had told me a year ago that I’d stop buying bread and start baking it in my air fryer, I probably wouldn’t have believed them. But after making this simple homemade loaf over and over again, I completely understand the appeal.
It’s affordable, easy, incredibly satisfying, and tastes better than many store-bought loaves. The crispy crust, soft interior, and fresh-baked aroma make every batch feel special.
Whether you’re trying to save money, avoid preservatives, or simply enjoy baking, this Air Fryer Homemade Bread recipe is one worth keeping in your regular rotation.
Once you make your first loaf, there’s a good chance you’ll find yourself skipping the bread aisle too.