
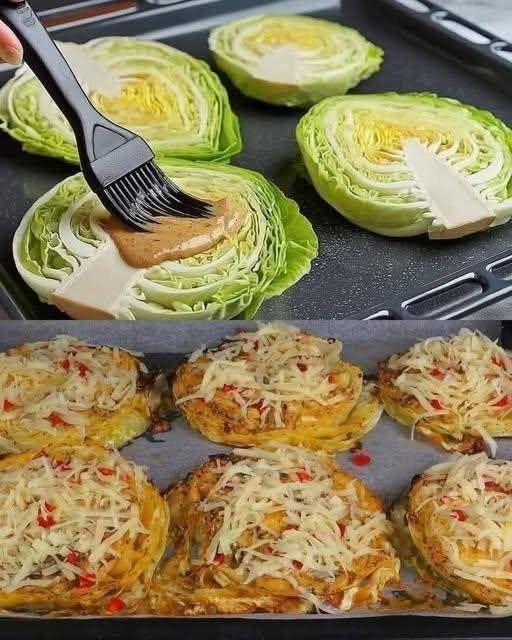
Looking for a delicious, low-carb side dish or vegetarian main? These Cheesy Roasted Cabbage Steaks are caramelized, tender, and topped with gooey cheese. Perfect for busy weeknights!
Cheesy Roasted Cabbage Steaks: Your New Favorite Side Dish
Honestly, cabbage has a bit of a PR problem. For the longest time, I thought of it as just that crunchy, slightly bitter stuff you throw into a slaw or boil until it’s flavorless. I usually avoided it at the grocery store altogether. But then I discovered the absolute magic of roasting it. High heat completely transforms cabbage, coaxing out this incredible natural sweetness and caramelizing the edges perfectly.
When you slice it thick, brush it with a rich, savory glaze, and top it with a mountain of melted cheese, it becomes something else entirely. If you take a look at image_a40efc.jpg, you can see exactly what I mean—that satisfying process of brushing the savory marinade into all those leafy layers before it bakes into bubbly, golden perfection. It is incredibly budget-friendly, takes barely any prep, and has become a staple in my weekly dinner rotation. Whether you are eating low-carb, keto, or just want a cozy vegetable dish that actually tastes amazing, you have to try this.
Let’s get cooking!
What You’ll Need (Ingredients)
I love that this recipe relies mostly on things I already have in my pantry and fridge.
-
1 Large Head of Green Cabbage: Make sure it’s firm and tightly packed.
-
3 tbsp Olive Oil: You can also use melted butter if you want it extra rich.
-
1 tbsp Dijon Mustard: This gives the glaze a beautiful, tangy depth.
-
1 tsp Garlic Powder: Because everything is better with garlic.
-
1/2 tsp Onion Powder: Adds a nice savory background note.
-
1/2 tsp Sea Salt & 1/4 tsp Black Pepper: Essential for flavor.
-
1 Cup Shredded Cheese: I usually use a mix of mozzarella and cheddar, but Gruyère is amazing too!
-
Red Pepper Flakes: Just a pinch for garnish and a tiny kick of heat.
Step-by-Step Method
This is so simple, it barely feels like a recipe!
-
Preheat and Prep: Preheat your oven to 400°F (200°C). Line a large, rimmed baking sheet with parchment paper to make cleanup a breeze.
-
Slice the Cabbage: Peel off any loose or bruised outer leaves. Place the cabbage on a cutting board and slice it from top to bottom into 3/4-inch to 1-inch thick slabs.
-
Mix the Glaze: In a small bowl, whisk together your olive oil, Dijon mustard, garlic powder, onion powder, salt, and pepper until it forms a smooth paste.
-
Brush and Bake: Lay the cabbage steaks flat on your prepared baking sheet. Using a silicone basting brush, generously coat the top of each steak with the glaze, working it slightly into the layers. Bake for 25 to 30 minutes until the cabbage is tender in the center and crispy on the edges.
-
Add the Cheese: Pull the tray out of the oven and sprinkle your shredded cheese evenly over the top of each steak. Add a sprinkle of red pepper flakes if you like a little heat.
-
Melt and Serve: Return the pan to the oven for about 3 to 5 minutes, just until the cheese is beautifully melted and starting to bubble. Serve immediately!
My Top Cooking Tips
-
Keep the core intact: This is the biggest secret to success! When you slice the cabbage, make sure each “steak” still has a piece of the core attached at the bottom. This holds all the leaves together so it doesn’t fall apart on your baking sheet.
-
Don’t skip the parchment paper: The glaze and the cheese will inevitably melt off the sides. Parchment paper saves you from scrubbing a baked-on mess later.
-
Dry your cabbage: If you wash your cabbage, make sure to pat the outside completely dry before slicing. Extra moisture creates steam, and we want these to roast and caramelize, not steam!
Serving Suggestions
These Cheesy Roasted Cabbage Steaks are incredibly versatile. I usually serve them as a hearty side dish alongside grilled chicken, baked pork chops, or a juicy steak. Honestly, they are also satisfying enough to stand completely on their own as a vegetarian main course. If I’m eating them as a main, I love pairing them with a simple side salad and some crusty garlic bread to soak up any leftover savory juices.
Approximate Nutrition Info (Per Serving)
-
Calories: 165 kcal
-
Protein: 8g
-
Fat: 12g
-
Carbohydrates: 7g
-
Fiber: 3g
Conclusion
If you’ve been on the fence about cabbage, I really hope you give this method a try. It’s cheap, incredibly flavorful, and takes hardly any effort to throw together on a busy weeknight. Once you experience those crispy, caramelized edges combined with the gooey melted cheese, you’ll be making this on repeat just like I do. Leave a comment below if you try it—I’d love to hear how it turned out for you!
Frequently Asked Questions (FAQs)
1. Why did my cabbage steaks fall apart when I sliced them? This usually happens if you cut the core out before slicing, or if you slice the ends of the cabbage that don’t connect to the core. Always keep the core intact, as it acts like the “glue” that holds all the leafy layers together during roasting.
2. Can I make these ahead of time? You can certainly slice the cabbage and mix the glaze a day in advance, storing them separately in the fridge. However, I highly recommend roasting them right before you plan to eat. Cabbage is best served warm and fresh out of the oven to maintain those crispy edges.
3. Can I use a different type of cabbage? Green cabbage works best because it’s dense and holds its shape beautifully under high heat. Red cabbage will also work and looks vibrant, though the flavor is slightly earthier. I would avoid Savoy or Napa cabbage for this specific recipe, as their leaves are too delicate and will burn quickly.
4. How do I store and reheat leftovers? Store any leftover steaks in an airtight container in the refrigerator for up to 3 days. To reheat, I suggest popping them back in the oven at 350°F (175°C) or in an air fryer for a few minutes until warmed through. Microwaving works in a pinch, but you will lose the crispy texture.
5. Can I make this recipe vegan or dairy-free? Absolutely! Just swap the shredded cheese for your favorite plant-based melting cheese, and ensure your savory glaze uses olive oil rather than butter. It turns out just as delicious!