
📝 Description
These homemade coconut bars are soft, chewy, and naturally sweet, coated in a smooth layer of rich chocolate. They’re incredibly easy to make with just a few ingredients and require no baking. Perfect for snacks, desserts, or even a healthier treat option, these bars are often compared to popular store-bought coconut candy bars—but fresher and customizable.
🛒 Ingredients
- 2 ½ cups shredded coconut (unsweetened or sweetened)
- 1/2 cup sweetened condensed milk (or coconut condensed milk for dairy-free)
- 1 tsp vanilla extract
- 1–2 cups chocolate chips (dark, milk, or semi-sweet)
- 1 tbsp coconut oil (optional, for smoother melting)
👩🍳 Instructions
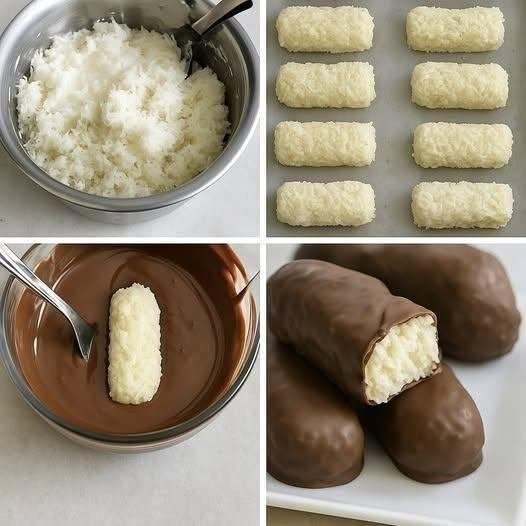
Step 1: Prepare the Coconut Mixture
In a large mixing bowl, combine shredded coconut, sweetened condensed milk, and vanilla extract. Stir thoroughly until the mixture becomes sticky and holds together when pressed.
Step 2: Shape the Bars
Take small portions of the mixture and shape them into compact rectangular bars (similar to mini logs). Place them on a parchment-lined tray.
Step 3: Chill
Transfer the tray to the refrigerator or freezer for about 20–30 minutes. This helps the bars firm up, making them easier to coat in chocolate.
Step 4: Melt the Chocolate
In a microwave-safe bowl, melt chocolate chips in 20–30 second intervals, stirring in between until smooth. Add coconut oil if desired for a glossy finish.
Step 5: Coat the Bars
Using a fork or dipping tool, dip each coconut bar into the melted chocolate, ensuring it’s fully coated. Let excess chocolate drip off before placing it back on the parchment paper.
Step 6: Set the Chocolate
Refrigerate the coated bars for another 15–20 minutes or until the chocolate is fully hardened.
🍫 Tips for Perfect Coconut Bars
- Use unsweetened coconut if you want to control sugar levels.
- Chill thoroughly before dipping to avoid bars falling apart.
- Add a pinch of salt for a sweet-salty flavor balance.
- For a thicker coating, dip the bars twice.
🔄 Variations
- Vegan version: Use coconut condensed milk and dairy-free chocolate.
- Keto-friendly: Replace condensed milk with a low-carb alternative and use sugar-free chocolate.
- Almond coconut bars: Insert a whole almond inside each bar for a crunchy center.
- Protein coconut bars: Mix in a scoop of vanilla protein powder.
❓ Frequently Asked Questions (High CPM Topics)
1. Are homemade coconut bars healthy?
Yes, they can be healthier than store-bought versions because you control the ingredients. Using unsweetened coconut and dark chocolate increases fiber and reduces added sugar.
2. How many calories are in chocolate coconut bars?
On average, one homemade bar contains 120–180 calories depending on size and ingredients. Using dark chocolate and less condensed milk can reduce calories.
3. Can I freeze coconut chocolate bars?
Absolutely. These bars freeze well for up to 2 months. Store them in an airtight container and thaw for a few minutes before eating.
4. What chocolate is best for coating?
High-quality dark chocolate (60–70% cocoa) is ideal for a rich flavor and smoother coating. Milk chocolate works if you prefer sweeter treats.
5. How do I make coconut bars without condensed milk?
You can substitute with a mixture of coconut cream and a natural sweetener like honey or maple syrup. Blend until thick before mixing with coconut.
6. Are coconut bars gluten-free?
Yes, this recipe is naturally gluten-free, making it perfect for people with gluten sensitivities.
7. Can I use desiccated coconut instead of shredded?
Yes, but the texture will be finer and slightly denser. You may need to adjust the liquid slightly.
💡 Final Thoughts
These chocolate-covered coconut bars are simple, customizable, and incredibly satisfying. Whether you’re looking for a quick dessert, a healthier candy alternative, or even a homemade gift idea, this recipe checks all the boxes. Plus, with options for vegan, keto, and gluten-free diets, it’s versatile enough for almost anyone.