Learn how to bake bakery-quality artisan bread at home with this easy no-knead cranberry rosemary recipe. Crispy crust, chewy crumb, and zero kneading required!
Introduction: Why I Fell in Love with This Bread
I honestly used to think that baking artisan bread at home required years of pastry school experience, special commercial equipment, and hours of aggressive kneading on a floured countertop. But let me tell you, once I discovered the magic of no-knead bread, my whole kitchen routine changed.
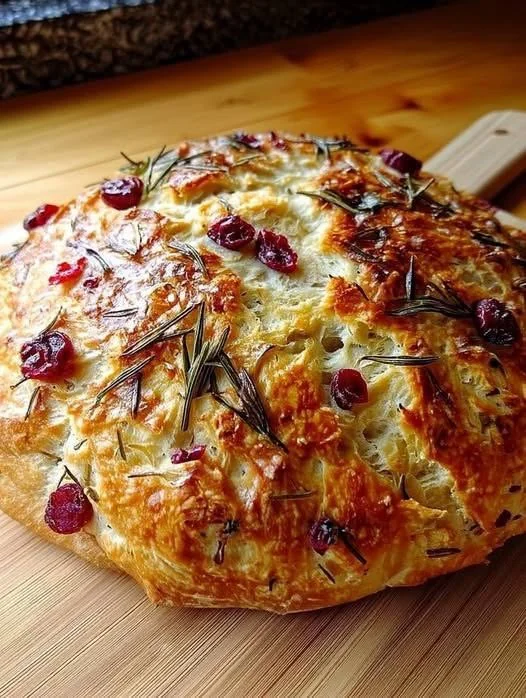
This Cranberry Rosemary No-Knead Artisan Bread is absolute proof that patience does the heavy lifting for you. The first time I pulled a loaf of this out of my Dutch oven, I couldn’t believe my eyes—it had that gorgeous, crackly, golden-brown crust and wide-open crumb structure that you usually only see at local high-end bakeries.
The combination of tart, chewy dried cranberries and earthy, aromatic fresh rosemary is just heavenly. I usually bake a loaf whenever we’re having a cozy weekend soup night or when friends are coming over. Trust me, the aroma that fills your house while this bakes is better than any scented candle you’ll ever buy!
Ingredients
Here is everything you need to gather to make this masterpiece at home:
-
All-Purpose Flour: 3 cups (plus a little extra for shaping and dusting)
-
Active Dry Yeast: 1/4 teaspoon (don’t worry, even with a tiny amount, long fermentation does the trick!)
-
Salt: 1.5 teaspoons (kosher salt or fine sea salt works best)
-
Warm Water: 1.5 cups (lukewarm, about 105°F–110°F)
-
Dried Cranberries: 1/2 cup (sweet and tart contrast)
-
Fresh Rosemary: 2 tablespoons, finely chopped (plus a few extra sprigs for topping)
-
Optional Sweetness: 1 tablespoon honey or maple syrup if you like a subtle touch of sweetness in the dough
Step-by-Step Method
Don’t let bread-making intimidate you—this process is remarkably hands-off. Here is how I do it step-by-step:
Step 1: Mix the Sticky Dough
In a large mixing bowl, whisk together the flour, yeast, and salt. Toss in your dried cranberries and chopped fresh rosemary so they are evenly distributed through the dry ingredients. Pour in the warm water (and honey, if using). Using a wooden spoon or a silicone spatula, stir everything together just until a sticky, shaggy dough forms. There should be no dry flour pockets left, but the dough will look messy—and that is completely normal!
Step 2: The Long Rise (The Magic Part)
Cover your bowl tightly with plastic wrap or a damp kitchen towel. Now, let it sit on your kitchen counter at room temperature for 12 to 18 hours. I usually mix mine right before bed (around 9:00 PM) and let it work its magic overnight. By morning, you’ll see the surface covered in little bubbles, and the dough will have doubled in size.
Step 3: Shape and Rest
Lightly flour a work surface and scrape your bubbly dough out of the bowl. Fold it over on itself two or three times to form a rough ball. Shape it gently into a round loaf (boule). Place the shaped dough onto a sheet of parchment paper, cover it loosely with a towel, and let it rest for about 30 to 45 minutes while your oven preheats.
Step 4: Preheat the Dutch Oven
About 30 minutes before your dough finishes its second rest, place a heavy 4-to-6-quart cast-iron Dutch oven with its lid on inside your oven. Crank the oven temperature up to 450°F (230°C). Preheating the pot is the secret weapon for getting that ultimate crunchy bakery crust!
Step 5: Bake to Golden Perfection
Carefully remove the blazing-hot Dutch oven from the oven and take off the lid. Using the corners of your parchment paper as handles, lift the dough (still on the parchment) and gently lower it right into the hot pot. Drop a few extra sprigs of rosemary and a few cranberries on top for that gorgeous rustic look.
Cover with the hot lid and bake for 30 minutes. Then, remove the lid and bake for another 12 to 15 minutes, or until the crust is deeply golden brown and sounds hollow when tapped.
Step 6: Cool and Slice
Transfer your gorgeous loaf to a wire rack. I know it’s agonizingly hard, but let it cool completely for at least 45 minutes before slicing. Cutting into it while it’s piping hot will make the inside gummy!
My Top Cooking Tips
-
Don’t skip the preheated pot: Baking inside a heavy, covered Dutch oven traps the steam escaping from the dough, which prevents the crust from hardening too early and allows the bread to expand fully.
-
Flour your hands: The dough is quite sticky, so dusting your hands with a bit of flour before shaping will save you a huge headache.
-
Add a twist: If you love nuts, I occasionally toss in 1/3 cup of chopped toasted walnuts right along with the cranberries. It adds an amazing crunch!
Serving Suggestions
This bread has so much flavor on its own that you honestly don’t need much, but here are my favorite ways to serve it:
-
Slathered with salted butter or a thick layer of creamy goat cheese.
-
Toast a thick slice and drizzle it with hot honey.
-
Pair it alongside a warm bowl of creamy butternut squash soup or tomato basil soup.
-
Use leftover slices to make an epic turkey and brie panini the next day.
Nutrition Information (Approx. Per Serving)
-
Calories: ~180 kcal
-
Carbohydrates: 36 g
-
Protein: 4 g
-
Fat: 0.8 g
-
Fiber: 2 g
-
Sodium: 320 mg
(Note: Nutritional values are approximate estimates based on 10 slices per loaf.)
Conclusion
Baking this Cranberry Rosemary No-Knead Artisan Bread feels like a little victory every single time. It takes minimal active effort, uses pantry staples, and delivers results that will make you feel like a professional artisan baker in your own kitchen. Give it a try this weekend, and let me know how your crust turns out in the comments below!
Frequently Asked Questions (FAQs)
1. Can I use frozen cranberries instead of dried ones?
I wouldn’t recommend it. Frozen cranberries release too much liquid and moisture into the dough, which can mess up the texture and make your bread heavy or soggy. Stick to dried cranberries for the best results!
2. What if I don’t have a Dutch oven?
No problem! You can bake the bread on a preheated pizza stone or heavy baking sheet. Just place a metal pan filled with a cup of hot water on the bottom rack of your oven during the first 30 minutes of baking to create the necessary steam for a crispy crust.
3. Can I use active dry yeast or instant yeast interchangeably?
Yes, you can use either instant or active dry yeast for this recipe. Because the dough rests for 12 to 18 hours, both types of yeast will easily activate and develop wonderful flavor during the long fermentation.
4. How should I store leftover bread?
Artisan bread is best enjoyed fresh within the first 1–2 days. Store it in a paper bag or a bread box at room temperature to keep the crust crisp. Avoid plastic bags, as they trap moisture and make the crust soggy. You can also freeze sliced bread for up to 2 months.
5. Why did my bread turn out dense and flat?
This usually happens for one of a few reasons: your yeast might be old and inactive, your water was too hot (which kills the yeast), or your rising environment was too cold. Make sure your water is just lukewarm, and give your dough a nice warm spot to rest!