
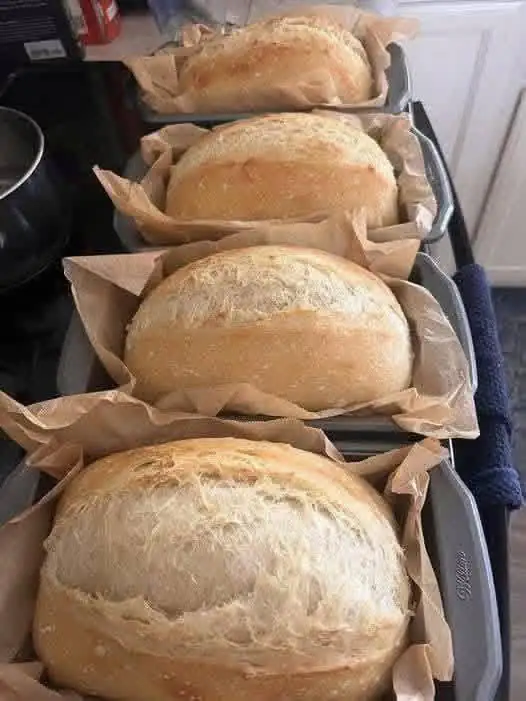
I used to think making homemade bread meant kneading dough for ages, getting flour everywhere, and hoping I hadn’t somehow ruined it. Then I tried this simple no-knead bread recipe, and I couldn’t believe how easy it was.
No eggs.
No butter.
No fancy equipment.
And most importantly—no kneading!
I usually mix the dough in the evening, cover it, and let time do all the work. The next day, I shape it, let it rest briefly, and bake it until the crust is beautifully golden and crisp.
The inside is soft and chewy, while the outside has that lovely rustic crust that makes homemade bread so satisfying.
And because the ingredients are so basic, it’s also a wonderfully budget-friendly homemade bread recipe.
Why You’ll Love This No-Knead Bread
-
No kneading required
-
No eggs
-
No butter
-
Uses simple pantry ingredients
-
Beginner-friendly
-
No stand mixer needed
-
Deliciously crisp crust
-
Soft, chewy interior
-
Great for sandwiches, toast and dipping
-
Much cheaper than buying specialty artisan bread
Ingredients
You only need a handful of basic ingredients.
For the Bread
-
4 cups (500 g) all-purpose flour or bread flour
-
2 cups (480 ml) lukewarm water
-
2 teaspoons salt
-
1 teaspoon instant or active dry yeast
-
1 teaspoon sugar — optional, but helpful for activating the yeast
That’s it!
No eggs, no milk, no butter and no oil are necessary.
How to Make Easy No-Knead Bread
Step 1: Mix the Dough
Add the flour, yeast, salt and sugar to a large mixing bowl.
Pour in the lukewarm water and stir everything together with a wooden spoon or spatula.
Don’t worry about making the dough perfectly smooth. That’s actually the beauty of this recipe.
The dough should be very soft and sticky.
If it looks too dry, add a tablespoon or two of water. If it looks extremely wet and soupy, add a little flour.
Step 2: Cover and Let It Rise
Cover the bowl tightly with plastic wrap, a lid or a clean kitchen towel.
Leave it at room temperature for approximately 8–12 hours.
I usually prepare mine before going to bed and let it rise overnight.
By morning, the dough should look noticeably larger, bubbly and airy.
Don’t rush this step. The long resting time is what gives this bread its wonderful texture and flavor without requiring any kneading.
Step 3: Shape the Dough
Lightly flour your work surface.
Turn the dough out onto the floured surface. It will be sticky, so don’t be surprised!
Sprinkle a little flour over the top and gently fold the dough over itself a few times.
You don’t need to knead it like traditional bread dough. Just shape it into a rough round loaf.
If you’d like smaller loaves, divide the dough into two or three portions and shape each one gently.
Step 4: Let the Dough Rest Again
Place the shaped dough on parchment paper or into a lightly floured bowl.
Cover it loosely and let it rest for approximately 30–60 minutes.
Meanwhile, preheat your oven to 450°F (230°C).
If you’re using a Dutch oven or heavy oven-safe pot, place it in the oven while the oven preheats.
That hot pot helps create the beautiful crust we’re looking for.
Step 5: Score the Bread
Just before baking, use a sharp knife or bread lame to make one or two shallow cuts across the top of the dough.
This gives the bread somewhere to expand while baking and also gives it that classic homemade artisan appearance.
Step 6: Bake
If Using a Dutch Oven
Carefully remove the hot pot from the oven.
Place the dough inside, keeping it on the parchment paper if desired.
Cover with the lid and bake for approximately 25–30 minutes.
Then remove the lid and continue baking for another 10–15 minutes, until the loaf is deeply golden brown.
If Using a Regular Baking Tray
Place the shaped dough on a parchment-lined baking sheet.
Bake at 450°F (230°C) until golden brown and cooked through, usually around 30–40 minutes, depending on the size of the loaf.
For a crispier crust, you can place a small oven-safe dish of hot water in the oven during baking to create steam.
Step 7: Let It Cool
This is probably the hardest part!
I know it’s tempting to slice the bread immediately, but let it cool for at least 30–60 minutes before cutting.
The inside continues to set as the bread cools.
If you cut it too early, you may end up with a gummy-looking center even though the bread is fully baked.
Once cooled, slice it and enjoy!
My Best Tips for Perfect No-Knead Bread
1. Don’t add too much flour
Sticky dough is normal for no-knead bread. Adding lots of extra flour can make the finished loaf dense.
2. Use lukewarm water
The water should feel comfortably warm, not hot. Very hot water can damage the yeast.
3. Give the dough enough time
The long fermentation is the secret here. If your kitchen is cool, the dough may need additional time to rise.
4. Don’t worry about perfect shaping
This is rustic bread. Honestly, a slightly uneven loaf is part of the charm!
5. Preheat your Dutch oven
If you’re using one, getting it thoroughly hot before adding the dough helps produce a crisp crust.
6. Watch the final baking stage
Once the lid comes off, the bread can brown quickly. Keep an eye on it during the last 10 minutes.
7. Let it cool before slicing
I know—it’s difficult! But this really does make a difference to the texture.
Can I Make Smaller Loaves?
Absolutely.
Instead of making one large loaf, divide the dough into 2–4 smaller portions.
This is especially handy if you’re baking for a family. You can bake several smaller rustic loaves and freeze the extras.
Just remember that smaller loaves generally require less baking time, so start checking them earlier.
How to Store Homemade Bread
Once completely cool, keep the bread in a paper bag, bread box or loosely covered container at room temperature.
For longer storage, slice the loaf and freeze it in an airtight freezer bag.
Then you can take out individual slices whenever you need them.
I usually like to toast frozen slices straight from the freezer—it works surprisingly well.
Serving Suggestions
There are so many ways to enjoy this bread!
For Breakfast
Toast a slice and top it with:
-
Butter
-
Jam
-
Honey
-
Peanut butter
-
Scrambled eggs
-
Avocado
For Lunch
Use it to make:
-
Grilled cheese sandwiches
-
Chicken sandwiches
-
Tuna sandwiches
-
Vegetable sandwiches
-
Turkey or beef sandwiches
For Dinner
Serve warm slices alongside:
-
Soup
-
Stews
-
Pasta
-
Roasted vegetables
-
Grilled chicken
-
Salads
And honestly, one of my favorite ways to eat it is simply warm from the oven with a little butter.
Simple, but so good.
Approximate Nutrition Information
The following is an estimate based on the entire loaf being divided into approximately 12 servings:
-
Calories: 165–175
-
Carbohydrates: 34–36 g
-
Protein: 5–6 g
-
Fat: 0–1 g
-
Fiber: 1–2 g
-
Sodium: 380–420 mg
Nutrition information is approximate and will vary depending on the flour, serving size and amount of salt used.
Frequently Asked Questions
1. Can I really make bread without kneading?
Yes! That’s the whole idea behind this recipe. Instead of developing the gluten through traditional kneading, the long fermentation period allows the dough to develop structure and flavor naturally.
2. Can I use all-purpose flour?
Absolutely. All-purpose flour works very well for this recipe. Bread flour can give you a slightly chewier texture, but you don’t need it.
3. Why is my dough so sticky?
No-knead dough is supposed to be fairly sticky and wet. Try not to add large amounts of flour. Lightly flour your hands and work surface when shaping instead.
4. Can I let the dough rise longer than 12 hours?
You can, but the exact timing depends on your room temperature and yeast quantity. If your kitchen is warm, the dough may rise faster. If it rises too much and collapses, the loaf can become flatter and denser.
5. Can I freeze homemade bread?
Yes. Let the bread cool completely, then wrap it well or place it in a freezer-safe bag. You can freeze the whole loaf or slice it first for easier serving.
Final Thoughts
Honestly, this no-knead bread recipe is one of those recipes that makes homemade baking feel much less intimidating.
You don’t need a mixer, special ingredients, eggs or butter. You don’t even need to spend time kneading dough.