Looking for a quick, flaky, and wildly delicious dinner? This Pan-Seared Garlic Butter Cod is ready in under 15 minutes, melts in your mouth, and requires minimal cleanup. The ultimate easy weeknight seafood recipe!
My Go-To Weeknight Lifesaver
Honestly, finding a weeknight dinner that feels a little bit fancy but actually takes zero effort is my ultimate goal in the kitchen. Between working, running errands, and just trying to keep my head above water, spending an hour over a hot stove on a Tuesday is simply not happening.
I usually lean on chicken breasts, but lately, I’ve been trying to incorporate more seafood into our meals. That’s how this Pan-Seared Garlic Butter Cod became a staple in my house. The first time I made it, I was shocked at how quickly it came together. It looks like something you’d order at a nice seaside restaurant, but it literally takes 15 minutes from fridge to plate.
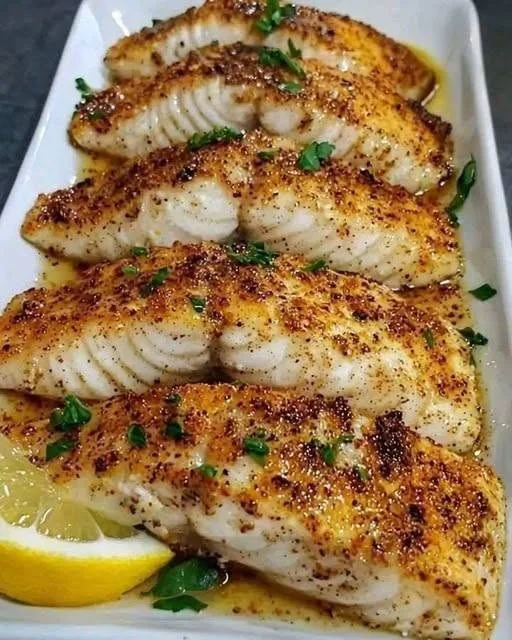
If you take a look at the mouthwatering spread in image_fa0303.png, you’ll see exactly how this recipe turns out—golden, perfectly flaky fillets coated in a rich, slightly smoky spice rub, all swimming in an incredible lemon-garlic butter sauce. It is pure comfort food, but light enough that you don’t feel weighed down afterward.
Let’s dive into how to make it!
What You’ll Need (Ingredients)
You probably have most of these sitting in your pantry and fridge right now.
-
Cod Fillets: 4 portions (about 5-6 oz each). Fresh is great, but thawed frozen cod works beautifully too.
-
Olive Oil: 1 tablespoon (for searing).
-
Butter: 3 tablespoons (unsalted is best so you can control the sodium).
-
Garlic: 3 cloves, minced (measure with your heart, honestly).
-
Paprika: 1 teaspoon (this gives it that gorgeous golden-red crust!).
-
Salt & Black Pepper: To taste.
-
Fresh Parsley: A handful, finely chopped for garnish.
-
Lemon: 1 whole lemon (half juiced, half cut into wedges for serving).
How to Make It (Step-by-Step)
-
Prep the Fish: This is the most important step! Take a paper towel and pat the cod fillets completely dry. If they are wet, they will steam instead of sear.
-
Season Liberally: Sprinkle both sides of the fish with salt, black pepper, and the paprika. Rub it in just a little bit so it sticks.
-
Heat the Pan: Heat the olive oil in a large skillet (cast iron is amazing for this if you have it) over medium-high heat.
-
The Sear: Once the oil is shimmering and hot, carefully lay the cod fillets in the pan. Let them cook undisturbed for about 3 to 4 minutes. You want to see a nice golden-brown crust forming on the bottom.
-
Flip and Butter Baste: Carefully flip the fish using a wide spatula. Immediately add the butter and minced garlic to the pan. As the butter melts and foams, tilt the pan slightly and use a spoon to continuously baste the melted garlic butter over the top of the fish for the remaining 3-4 minutes of cooking time.
-
Finish with Lemon: Remove the pan from the heat. Squeeze fresh lemon juice over the top, sprinkle with the freshly chopped parsley, and serve immediately!
My Top Cooking Tips for Perfect Fish
-
Dry fish is crispy fish: I can’t stress this enough. Patting the cod dry with paper towels is the secret to that beautiful restaurant-quality crust.
-
Leave it alone! When you put the fish in the pan, resist the urge to peek, poke, or move it. Let it develop that crust. It will naturally release from the pan when it’s ready to flip.
-
Don’t overcook: Cod cooks incredibly fast. You’ll know it’s done when it turns completely opaque and flakes apart easily when gently pressed with a fork.
Serving Suggestions
I usually serve this directly out of the pan because it just looks so rustic and inviting. Because the garlic butter sauce is out of this world, you must serve this with something to soak it up!
-
Carbs: Serve over a bed of fluffy jasmine rice, quinoa, or with a big slice of crusty sourdough bread.
-
Veggies: Roasted asparagus, steamed green beans, or a simple side salad with a bright vinaigrette cut through the richness of the butter perfectly.
Nutrition Information (Approximate)
Serving size: 1 fillet with a spoonful of sauce
-
Calories: 260 kcal
-
Protein: 24g
-
Fat: 16g
-
Carbohydrates: 2g
-
Fiber: 0g
-
Sugar: 0g
(Note: Nutritional information is a rough estimate and can vary based on the exact size of your fillets and how much butter makes it onto your plate!)
Conclusion
This Pan-Seared Garlic Butter Cod has completely changed my weeknight dinner game. It’s rich, flaky, packed with flavor, and cleanup is an absolute breeze since it only uses one skillet. If you try this recipe, leave a comment below and let me know what you served it with—I’m always looking for new side dish ideas!
Frequently Asked Questions (FAQs)
1. Can I use frozen cod for this recipe? Yes, absolutely! Just make sure to thaw it completely in the fridge overnight. Before seasoning, give it a really good squeeze and pat it extra dry with paper towels, as frozen fish tends to hold a lot of excess water.
2. I don’t have cod. What other fish can I use? Any firm, flaky white fish will work beautifully. Halibut, haddock, tilapia, or mahi-mahi are all fantastic substitutes.
3. How do I store and reheat leftovers? Store any leftover fish in an airtight container in the fridge for up to 2 days. Honestly, fish can be tricky to reheat without drying it out. I recommend reheating it gently in a skillet over low heat, or microwaving it at 50% power just until warmed through.
4. Why did my fish fall apart when I tried to flip it? This usually happens for two reasons: either the pan wasn’t hot enough, or you tried to flip it too early before the crust had time to form and release from the pan. Give it time, and use a wide, thin spatula!
5. Can I bake this instead of pan-searing? You can! Place the seasoned cod in a baking dish, pour the melted butter, garlic, and a squeeze of lemon over the top, and bake at 400°F (200°C) for about 12-15 minutes, or until flaky. You won’t get the same dark crust as the pan-sear, but it will still be delicious.