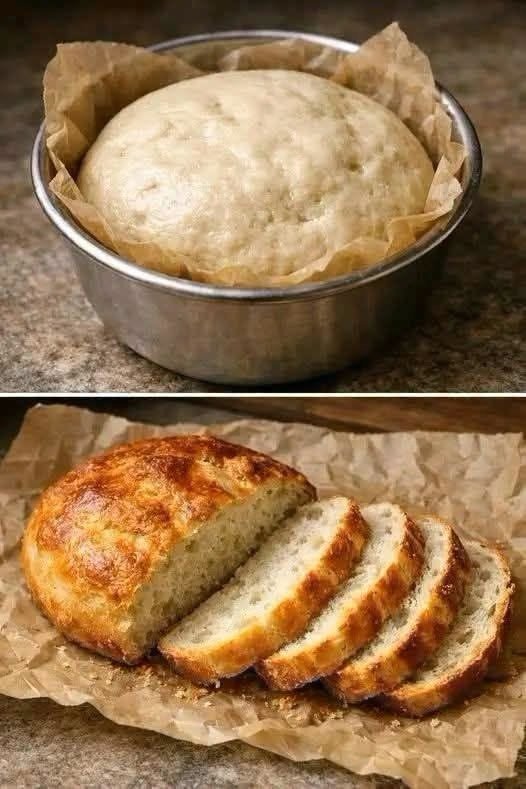
: Master the art of homemade bread with this foolproof no-knead artisan bread recipe. Crispy crust, soft interior, and minimal effort. Perfect for beginners!
A Little Backstory
Honestly, for the longest time, I thought baking bread was some kind of black magic that only professional bakers understood. I used to be so intimidated by the kneading, the rising times, and the potential for a dense, rock-hard loaf. But then I discovered the “no-knead” method, and my kitchen life changed forever. I usually bake this loaf on Sunday afternoons—it makes the whole house smell heavenly—and honestly, there is nothing more satisfying than that crackly sound the crust makes when you pull it out of the oven. If you’re a beginner, this is the absolute best place to start.
Ingredients
-
Flour: 3 cups all-purpose flour (or bread flour for a chewier texture).
-
Yeast: 1/2 tsp instant dry yeast.
-
Salt: 1.5 tsp kosher salt.
-
Water: 1.5 cups warm water (lukewarm, not boiling!).
-
Optional: A sprinkle of herbs or seeds if you want to get fancy.
Step-by-Step Method
-
Mix: In a large bowl, whisk together the flour, yeast, and salt. Pour in the warm water and stir until a shaggy, sticky dough forms. Honestly, don’t worry if it looks messy—it’s supposed to!
-
The Long Rise: Cover the bowl with plastic wrap and let it sit on your counter for 12–18 hours. I usually prep this at night and bake it the next morning. It just needs time to do its thing.
-
Shape: After the rise, the dough will be bubbly and loose. Gently scrape it onto a floured surface and shape it into a ball. Let it rest for another 30 minutes while you heat the oven.
-
Preheat: Place a Dutch oven (with the lid on) into your oven and preheat to 450°F (230°C). Letting the pot get piping hot is my top secret for a crispy crust.
-
Bake: Carefully place the dough into the hot Dutch oven (I use parchment paper to make this easier). Cover with the lid and bake for 30 minutes. Then, remove the lid and bake for another 10–15 minutes until it’s a beautiful deep golden brown.
My Top Cooking Tips
-
Patience is key: Honestly, don’t rush that first long rise. It’s what gives the bread that amazing flavor and airy structure.
-
Use a Dutch oven: If you have one, use it! The lid traps steam, which is exactly how bakeries get that incredible crust.
-
Let it cool: I know it smells amazing, but try to wait at least 30 minutes before slicing into it. It needs a moment to finish “cooking” on the inside.
Serving Suggestions
This bread is honestly perfect all on its own with a thick slab of salted butter. I usually serve it alongside a hearty bowl of soup, or I turn it into the ultimate grilled cheese sandwich the next day. It also makes for great avocado toast!
Nutrition Info (Approx. per serving)
-
Calories: 150
-
Protein: 4g
-
Fat: 0.5g
-
Carbs: 30g
Frequently Asked Questions (FAQs)
1. Can I use regular active dry yeast? Yes, but you might want to proof it in the warm water for 5 minutes first to make sure it’s active before mixing it with the flour.
2. Why is my bread flat? It might be because the dough was too runny or didn’t rise enough. Make sure to use a kitchen scale if you have one, as flour can be tricky to measure by volume.
3. Do I really need a Dutch oven? It works best, but if you don’t have one, you can bake it on a regular baking sheet with a pan of water on the bottom rack to create steam.
4. Can I add flavorings? Definitely! I usually add some rosemary, garlic, or even cheese during the initial mixing stage for a delicious twist.
5. How long does this bread last? Honestly, it’s best eaten within 1–2 days. Because there are no preservatives, it dries out faster than store-bought bread.
Conclusion
Making this no-knead artisan bread has honestly turned me into a bread-baking enthusiast. It’s so simple, so forgiving, and the results taste just like you spent all day at a professional bakery. Once you see how easy it is, you might never buy a store-bought loaf again!