Description
Learn how to make the easiest homemade no-knead bread with just a few pantry ingredients. No eggs, no butter, and no special equipment needed. Soft inside, crispy outside, and perfect for beginners!
The Easiest No-Knead Bread Recipe (No Eggs, No Butter)
I’ll be honest—I used to buy bread every week without thinking twice about it. Homemade bread always seemed like something that took hours of kneading and lots of baking experience. Then I discovered this simple no-knead recipe, and everything changed.
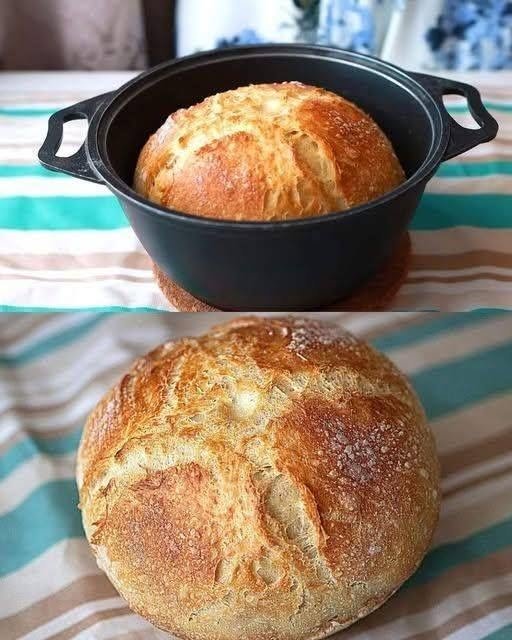
I usually mix the dough in the evening, let it rise overnight, and bake it the next morning. The smell of fresh bread filling the house is absolutely amazing. The crust comes out beautifully golden and crisp, while the inside stays soft, airy, and chewy. Best of all, there’s no kneading, no eggs, no butter, and only a handful of inexpensive ingredients.
Whether you’re a beginner or an experienced baker, this recipe is almost impossible to mess up. Once you make it, you may never want store-bought bread again.
Why You’ll Love This Recipe
- No kneading required
- No eggs or butter
- Budget-friendly ingredients
- Crispy artisan-style crust
- Soft, fluffy interior
- Beginner-friendly
- Perfect for sandwiches, toast, and soups
Ingredients
Makes 1 large loaf (8–10 slices)
- 3 cups (375g) all-purpose flour or bread flour
- 1¼ teaspoons salt
- 1 teaspoon instant yeast (or active dry yeast)
- 1½ cups (360ml) warm water (about 105–110°F / 40–43°C)
Optional
- Extra flour for dusting
- Cornmeal or parchment paper for easy transfer
Equipment
- Large mixing bowl
- Wooden spoon or spatula
- Dutch oven with lid (or oven-safe pot)
- Parchment paper
- Cooling rack
Step-by-Step Method
Step 1: Mix the Dough
In a large bowl, combine the flour, salt, and yeast.
Pour in the warm water and stir with a wooden spoon until a sticky dough forms. The dough should look rough and shaggy—that’s exactly what you want.
Cover the bowl with plastic wrap or a clean kitchen towel.
Step 2: Let It Rise
Leave the dough at room temperature for 8–12 hours, or overnight.
By morning, the dough should be doubled in size and full of bubbles.
Step 3: Shape the Dough
Lightly flour your work surface.
Turn the dough out gently and fold the edges toward the center a few times to form a rough ball. Avoid kneading, as this helps keep the bread light and airy.
Place the dough on a piece of parchment paper, cover it loosely, and let it rest for 30–45 minutes.
Step 4: Preheat the Dutch Oven
About 30 minutes before baking, place your Dutch oven (with the lid on) into the oven.
Preheat to 450°F (230°C).
Heating the pot first creates steam, giving the bread its signature crispy crust.
Step 5: Bake
Carefully remove the hot Dutch oven.
Using the parchment paper, lower the dough into the pot.
Cover with the lid and bake for 30 minutes.
Remove the lid and bake for another 10–15 minutes, or until the loaf is deep golden brown.
The bread should sound hollow when tapped on the bottom.
Step 6: Cool
Transfer the bread to a cooling rack.
Let it cool for at least 30 minutes before slicing. This helps the inside finish setting and prevents it from becoming gummy.
Cooking Tips
- Bread flour creates a slightly chewier texture, but all-purpose flour works perfectly.
- Don’t add too much extra flour—the dough should remain sticky.
- An overnight rise develops the best flavor.
- Always preheat the Dutch oven for a crisp artisan crust.
- Let the bread cool completely before slicing for the best texture.
Serving Suggestions
This homemade bread is delicious with:
- Butter and jam
- Garlic herb butter
- Olive oil and balsamic vinegar
- Homemade soup
- Chili
- Sandwiches
- Avocado toast
- Scrambled eggs
- Grilled cheese
- Bruschetta
Storage
Room Temperature
Store in a paper bag or bread box for up to 3 days.
Freezer
Slice and freeze in an airtight bag for up to 3 months. Toast slices directly from frozen.
Approximate Nutrition (Per Slice)
- Calories: 165
- Carbohydrates: 34g
- Protein: 5g
- Fat: 1g
- Fiber: 1g
- Sugar: 0g
- Sodium: 290mg
Nutrition values are approximate.
Variations
Whole Wheat Bread
Replace one cup of all-purpose flour with whole wheat flour.
Garlic Herb Bread
Mix in 1 teaspoon garlic powder and 1 tablespoon dried Italian herbs.
Cheese Bread
Fold in 1 cup shredded cheddar or Parmesan before rising.
Seeded Bread
Top with sesame, sunflower, or pumpkin seeds before baking.
Rosemary Bread
Add 2 teaspoons chopped fresh rosemary for an aromatic loaf.
Conclusion
This no-knead homemade bread proves that baking doesn’t have to be complicated. With no eggs, no butter, and no kneading, it’s one of the easiest bread recipes you’ll ever make. I usually bake a loaf on the weekend because it fills the kitchen with the most comforting aroma, and it never lasts long in our house. The crispy crust and soft, airy center make it perfect for everything from breakfast toast to hearty sandwiches. Once you see how simple and affordable homemade bread can be, you’ll find yourself making it again and again.
Frequently Asked Questions
1. Can I use active dry yeast instead of instant yeast?
Yes. If using active dry yeast, dissolve it in the warm water for 5–10 minutes before mixing it with the flour and salt.
2. Do I really need a Dutch oven?
A Dutch oven gives the best crust by trapping steam, but you can also bake the loaf on a baking sheet with a pan of hot water on the oven’s lower rack to create steam.
3. Why is my dough so sticky?
That’s completely normal. A wet, sticky dough is the secret to achieving a light, airy crumb and a crisp artisan-style crust.
4. Can I make this bread with whole wheat flour?
Yes. For the best texture, replace up to half of the all-purpose flour with whole wheat flour. Using all whole wheat flour will result in a denser loaf.
5. How do I know when the bread is done baking?
The loaf should be deep golden brown and sound hollow when tapped on the bottom. If you use a thermometer, the internal temperature should be around 200–210°F (93–99°C).