
Description
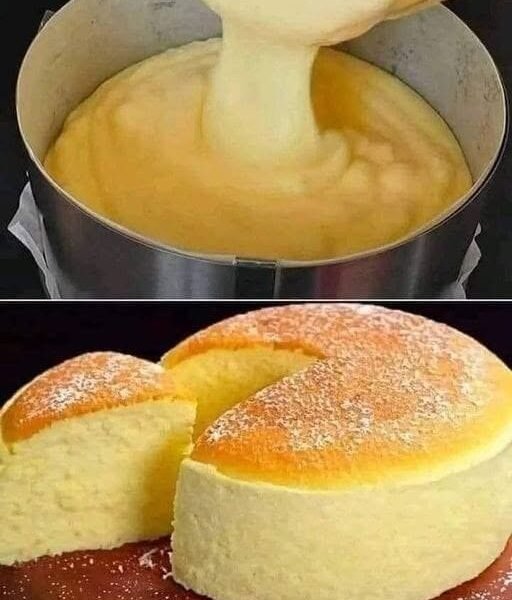
Discover the best Japanese Cotton Cheesecake recipe that’s incredibly light, fluffy, and creamy. This easy homemade soufflé cheesecake is guaranteed to impress family and friends with its cloud-like texture.
My Husband’s Exact Words After His First Bite…
“Oh my God, Ashley, this is fantastic! I’m actually hoping the kids don’t like theirs now!” 😁
Honestly, I laughed so hard when my husband said that. But after taking my own bite, I completely understood. This Japanese Cotton Cheesecake is one of those desserts that seems almost magical. It’s lighter than traditional cheesecake, softer than sponge cake, and practically melts in your mouth.
The first time I made it, I was a little nervous because I’d heard soufflé-style cheesecakes could be tricky. But once I learned a few simple techniques, it became one of my favorite desserts to bake. Now I usually make it for birthdays, holidays, or whenever I want something that feels extra special without being overly sweet.
If you’ve never tried Japanese Cotton Cheesecake before, you’re in for a treat!
What Is Japanese Cotton Cheesecake?
Japanese Cotton Cheesecake, also called Japanese Soufflé Cheesecake, combines the richness of cheesecake with the airy texture of a soufflé. The result is an incredibly soft, fluffy dessert that jiggles beautifully and practically dissolves on your tongue.
Unlike traditional New York cheesecake, it’s lighter, less dense, and delicately sweet.
Ingredients
For the Cheesecake
- 8 oz (225g) cream cheese, softened
- ¼ cup (60g) unsalted butter
- ½ cup (120ml) whole milk
- 6 large eggs, separated
- ½ cup (100g) granulated sugar
- ¾ cup (90g) cake flour
- 2 tablespoons cornstarch
- 1 teaspoon vanilla extract
- 1 teaspoon lemon juice
- ¼ teaspoon salt
For Garnish
- Powdered sugar for dusting
- Fresh berries (optional)
Step-by-Step Method
Step 1: Prepare the Pan
- Preheat your oven to 320°F (160°C).
- Line an 8-inch round cake pan with parchment paper.
- Wrap the outside of the pan with foil to prepare for a water bath.
Step 2: Melt the Cream Cheese Mixture
- In a heatproof bowl, combine:
- Cream cheese
- Butter
- Milk
- Place over simmering water.
- Stir until completely smooth and creamy.
- Remove from heat and allow to cool slightly.
Step 3: Add Egg Yolks
- Add egg yolks one at a time.
- Mix until fully incorporated.
- Stir in vanilla extract and lemon juice.
Step 4: Add Dry Ingredients
- Sift together:
- Cake flour
- Cornstarch
- Salt
- Gradually fold into the cream cheese mixture until smooth.
Step 5: Make the Meringue
- In a clean bowl, beat egg whites until foamy.
- Gradually add sugar while beating.
- Continue until soft-to-medium peaks form.
The meringue should hold its shape but still have a slight curl at the tip.
Step 6: Fold Gently
- Fold one-third of the meringue into the batter.
- Add the remaining meringue in two batches.
- Fold gently to keep as much air as possible.
This step creates the famous cotton-soft texture.
Step 7: Bake Using a Water Bath
- Pour batter into the prepared pan.
- Tap gently to remove large air bubbles.
- Place the cake pan into a larger baking pan.
- Fill the larger pan with hot water halfway up the sides.
Bake for:
- 25 minutes at 320°F (160°C)
- Then reduce to 285°F (140°C)
- Bake an additional 45–50 minutes
Step 8: Cool Slowly
- Turn off the oven.
- Leave the cheesecake inside with the door slightly open for 15 minutes.
- Remove and cool completely.
Dust with powdered sugar before serving.
Cooking Tips for the Perfect Cotton Cheesecake
Use Room Temperature Ingredients
I usually take everything out about 30 minutes before baking. It makes mixing much easier.
Don’t Overbeat the Meringue
Stiff peaks can cause cracking. Soft-to-medium peaks work best.
Fold Carefully
Be gentle when folding the egg whites into the batter. This keeps the cheesecake light and airy.
Water Bath Is Essential
The steam helps create that signature soufflé texture and prevents cracks.
Cool Gradually
Sudden temperature changes can cause the cake to collapse.
Serving Suggestions
This fluffy cheesecake is wonderful served with:
- Fresh strawberries
- Blueberries
- Raspberry sauce
- Whipped cream
- Lemon curd
- Hot coffee
- Green tea
Honestly, I love it most with nothing more than a light dusting of powdered sugar.
Nutrition Information (Approximate)
Per Serving (1 slice, based on 8 servings)
- Calories: 240
- Protein: 7g
- Carbohydrates: 22g
- Fat: 14g
- Saturated Fat: 8g
- Sugar: 15g
- Sodium: 170mg
- Fiber: 0.5g
Nutrition values are estimates and may vary.
Why This Recipe Works
- Light and fluffy texture
- Not overly sweet
- Beautiful bakery-style presentation
- Easy-to-follow instructions
- Perfect for celebrations
- Family-approved every time
Frequently Asked Questions
1. Why did my cheesecake collapse?
A slight shrinkage is normal. Major collapse usually happens from overmixing, overbaking, or sudden temperature changes.
2. Can I make this ahead of time?
Yes! It tastes even better after chilling in the refrigerator for a few hours.
3. Can I use all-purpose flour instead of cake flour?
Yes, but the texture may be slightly less delicate. Cake flour gives the fluffiest result.
4. How should I store leftovers?
Store covered in the refrigerator for up to 4 days.
5. Can I freeze Japanese cheesecake?
Absolutely. Wrap slices tightly and freeze for up to 2 months. Thaw overnight in the refrigerator before serving.
Conclusion
This Japanese Cotton Cheesecake is one of those recipes that instantly wins people over. Its cloud-like texture, delicate sweetness, and creamy flavor make it feel like something from a high-end bakery. Every time I make it, someone asks for the recipe, and my husband’s reaction still makes me smile.
If you’re looking for a dessert that’s elegant, unique, and surprisingly easy to make at home, give this fluffy Japanese cheesecake a try. Just don’t be surprised if your family starts fighting over the last slice!


